- FAQs on GSTR4 Offline Tool
- 1) How can I download and open the GSTR4 Offline Tool in my system from the GST Portal?
- 2) What are the basic system requirements/ configurations required to use GSTR4 Offline Tool?
- 3) How do I open or launch the GSTR4 Offline Tool?
- 4) Is the Offline tool mobile compatible?
- 5) Can a taxpayer sign/ submit his GSTR4 return in the Offline tool?
- 6) How can I reset GSTR-4 details uploaded to GST Portal?
- 7) How to Add records using the new column ACTION – added in Offline Tool?
- 8) How to update records using the new column ACTION – added in Offline Tool?
- 9) How to delete invoice records from a previously uploaded invoices in GSTR-4 by using Offline Tool?
- 10) During the process of Deletion of invoice record, which sheet to be validated?
- 11) What is the relevance of Get Summary button on home Page in an offline tool?
- 12) What happens if the JSON file uploaded errors out. What to do now?
- 13) What to do with records that error out during upload?
FAQs on GSTR4 Offline Tool
1) How can I download and open the GSTR4 Offline Tool in my system from the GST Portal?
- Login to the GST Portal www.gst.gov.in.
- Go to Downloads > Offline tools > GSTR4 Offline Tool > Download button.
- Unzip the downloaded Zip file which contain GSTR4 Offline Tool, User Manual, Read Me.txt and Release Note.
- Open the GSTR4_Excel_Utility_v3.0 excel sheet by double clicking on it.
2) What are the basic system requirements/ configurations required to use GSTR4 Offline Tool?
The offline functions work best on Windows 7 and above and MSEXCEL 2007 and above. Detailed system required are available at https://www.gst.gov.in/download/returns.
3) How do I open or launch the GSTR4 Offline Tool?
One can launch the GSTR4 Offline Tool by double clicking the downloaded GSTR_4_Offline_Utility_v3.0 excel sheet.
4) Is the Offline tool mobile compatible?
No. Offline tool cannot be used on mobile. Currently, Offline tool can only be used only on desktops.
5) Can a taxpayer sign/ submit his GSTR4 return in the Offline tool?
No. After upload of the return to the GST Portal, the taxpayer has to preview the form, proceed to file, Utilize Cash to pay off liabilities and then file GSTR4.
6) How can I reset GSTR-4 details uploaded to GST Portal?
There won’t be any reset in online version of GSTR4.You are free to make changes in details uploaded till you file the return. Only for the users who have form in submitted state and are yet to offset liabilities would have reset option available.
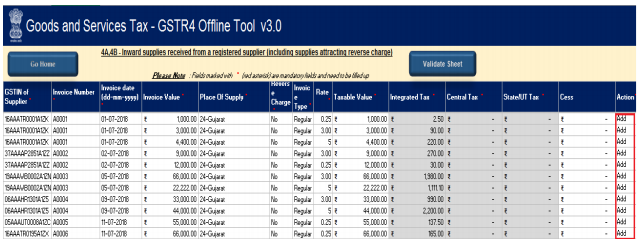
7) How to Add records using the new column ACTION – added in Offline Tool?
Taxpayer can make use of this feature to add invoice details in offline tool. After the details are filled up in each row select action as -ADD in Column ACTION at end of each row. Once the sheet is completely filled. click Validate Sheet button.
8) How to update records using the new column ACTION – added in Offline Tool?
To update a record which is uploaded earlier on GST portal. Fill in the updated details of the invoice/record in the worksheet and upload again with action as Add.
Note: Make sure to input complete details of invoice/record again not just the row with updated data.
For Instance, if you see refer the screenshot in point 7 FAQ
a) Invoice A0003, A0006 (0.25% to be updated to 3%) to be uploaded again with changed rate(s).
b) Invoice A0004 to be updated with change dates (9 July to be changed to 19 July)
c) Invoice A0007 and A0008 to be added to list.
d) No change in Invoice A0001, A0002, A0005
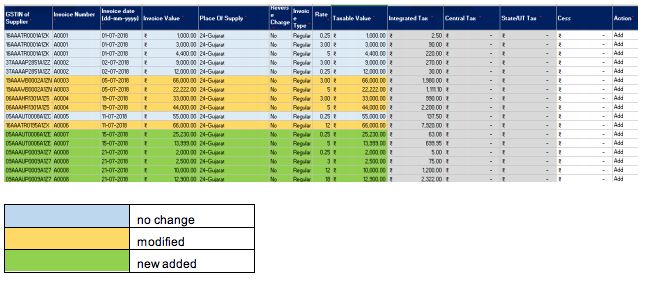
9) How to delete invoice records from a previously uploaded invoices in GSTR-4 by using Offline Tool?
The GSTR-4 sheet is to be uploaded again and select action as DELETE from dropdown placed at end of row against invoice records which need to be deleted.
PS: Action column to be populated with one value only. Action Add and Delete cannot be part of same sheet.
Scenario: if you refer the screenshot in FAQ-8
a) Invoice A0007 to be deleted
b) Invoice A0008 to be updated
c) Invoice A0009 and invoice A0010 to be added.
This will be performed in two Sequential steps
1) Perform deletion of intended invoice details,
2) Perform Addition / Update of records, the invoice(s) which are to remain intact are to be uploaded again.
The invoice A0007 to be deleted, so only those 2 rows should be part of upload and action to be selected as DELETE,

once done click on validate sheet button.
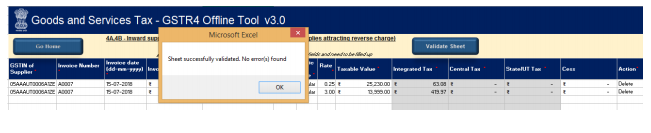
Second step we will add new invoice (A0009, A0010) and modify invoice (A0008), Invoice A0001, A0002, A003, A004, A005 and A0006 are to remain intact.

Once done, click on validate sheet button, a successful Message should appear” Sheet successfully Validated. No error(s) found.”
PS: The action status column shows the status of records uploaded earlier on GST portal and can help taxpayer to identify records uploaded on GST portal and new details added in a worksheet.
10) During the process of Deletion of invoice record, which sheet to be validated?
Since Deletion of invoice is a step by step process, each sheet need to be validated separately.
11) What is the relevance of Get Summary button on home Page in an offline tool?
The taxpayer after filling all details in the tiles, need to confirm that all that is filled is complete for the tax filing period. when the taxpayer clicks on generate summary button, all the data entered in tiles is taken as final and it will generate Summary of invoices entered. The Taxpayer can see all invoices added in sections (4A, 5b, 4D.etc) in one screen.
12) What happens if the JSON file uploaded errors out. What to do now?
The uploaded JSON file on the GST portal, status will be updated as ‘Processed with Error’. Click the Download error report link to download the error report. Now Open GSTR4 Tool and go to Home Tab under the section Error File Handling, browse to the error JSON file. Open the error file Only the error file with records not processed successfully would be available in the error JSON. The records processed successfully need not be uploaded again. For step by step method please see Upload Generated JSON on GST Portal
13) What to do with records that error out during upload?
Only the records which error out are to be corrected and have to be uploaded again. The records processed successfully need not be uploaded again. Correct the errors as mentioned in the column “GST Portal Validation Errors” in each sheet after making the corrections, upload the sheet again. Perform validation of individual worksheets, after each worksheet/ tab is successfully validated, click the Get Summary button to update the summary on Home tab. After generation of summary click on button ‘Generate JSON File to upload’ to generate JSON(.json) . For step by step method please see Upload Generated JSON on GST Portal