How to Upload and Download GST ANX 1 – Annexure of Outward Supplies
This article explains how you can prepare, upload, view and download your ANX 1 – new GST returns.
Note: In this document, the features which are not currently available in Trial version are highlighted in Grey.
Prepare and Upload ANX 1
-
Login to the GST Portal
-
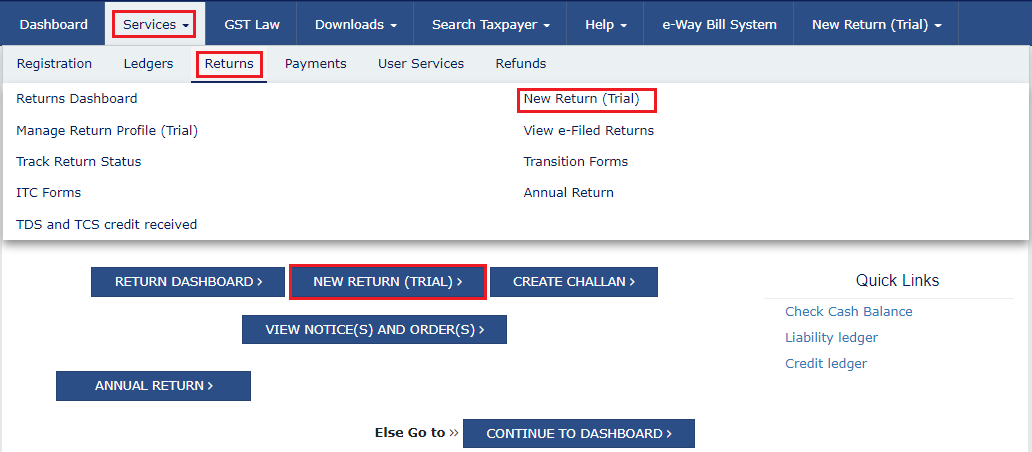
Navigate to Services > Returns > New Return (Trial)
-
Alternatively, you can also select New Return (Trial) on the dashboard
-
Select Financial Year, Return Filing Period, Form/Return and Preparation Mode from the drop-down list
-
Click Proceed

-
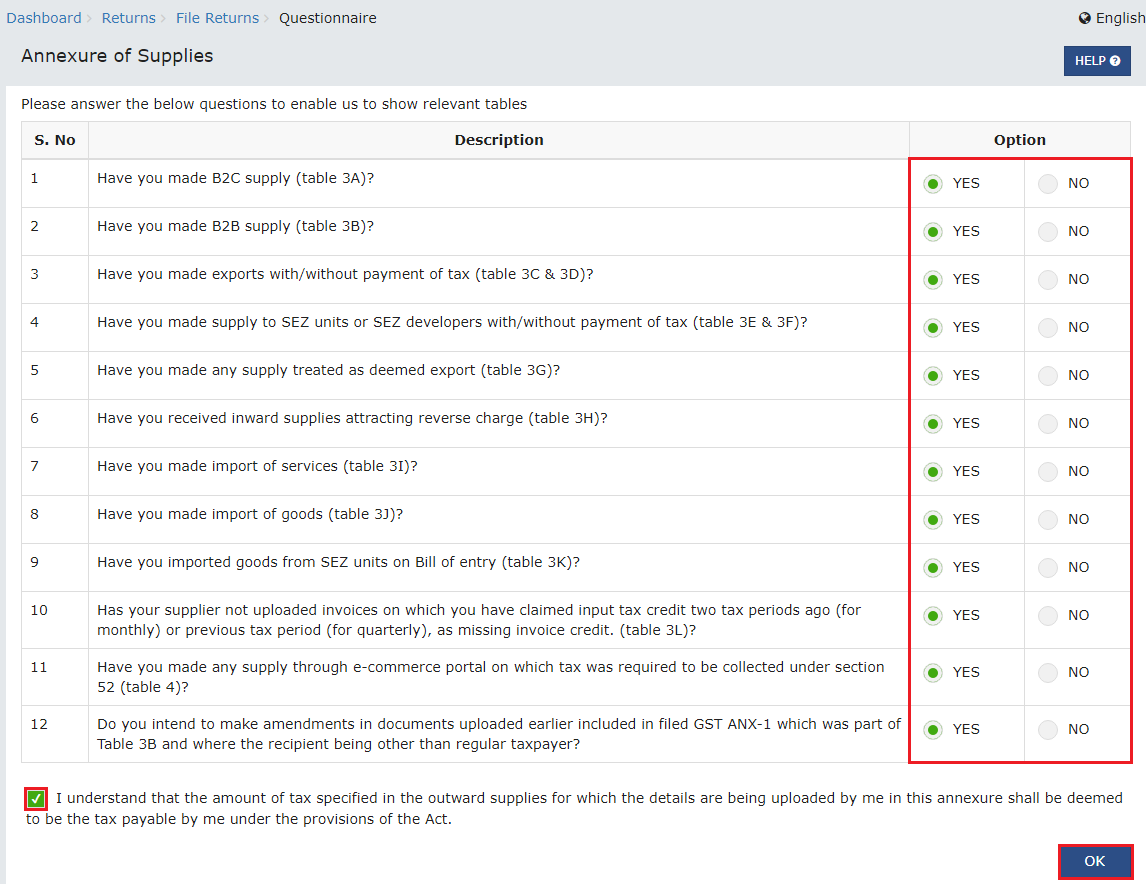
The government portal will now display a Questionnaire. You will need to answer all questions applicable to you under Select table to Add details drop-down list. Once the form is filled, choose the Declaration checkbox
-
Click OK
Note:
-
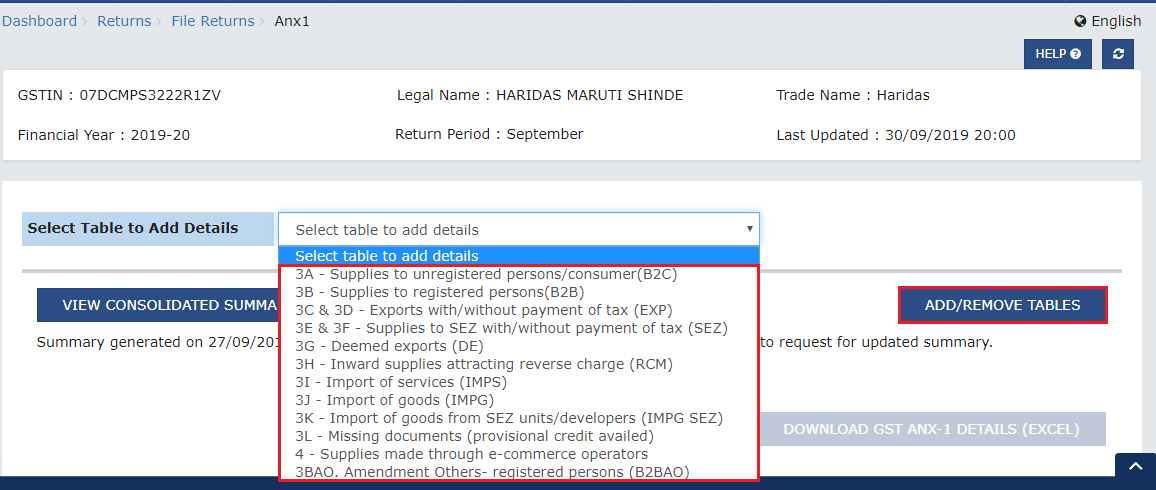
You will need to fill in the questionnaire only for the first time. To Add or Remove tables click the Add/Remove Tables button in ANX 1 Dashboard page. You will be navigated back at the ANX 1 Questionnaire page
-
Changing your selection from YES to NO would not auto-delete the added details, if any. Taxpayer will need to manually delete such records
-
From the ANX 1 Dashboard, select the appropriate table from the drop-down list to enter edit / view details.
Here, in this example, we will discuss about Table 3B – Supplies to registered persons (B2B) to enter details related to supplies to registered persons
Note: This table includes supplies made through e-commerce operators liable to collect TCS under section 52. The same details also need to be entered in Table no. 4
- Select the applicable check-boxes Differential % of tax rate OR Supply covered under Sec 7 of IGST Act. Based on your selection, relevant fields will get displayed
Note: Select Differential % of tax rate and Supply Covered Under Sec 7 of IGST Act only if it’s applicable

- Enter the supply data in the relevant fields and click the Add + button

- On clicking the Add + button, Item Details field gets displayed. Enter the item details in the relevant fields and click the Add + button to add more rows. Once all the details are added, click Save Document
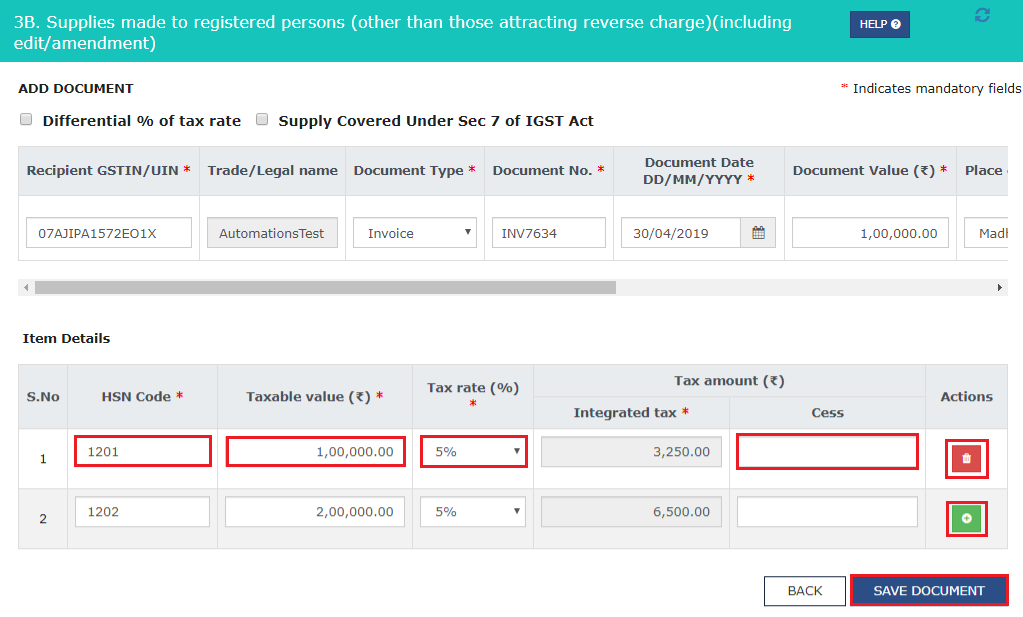
Note: You may add or delete data using the icons in the Actions column
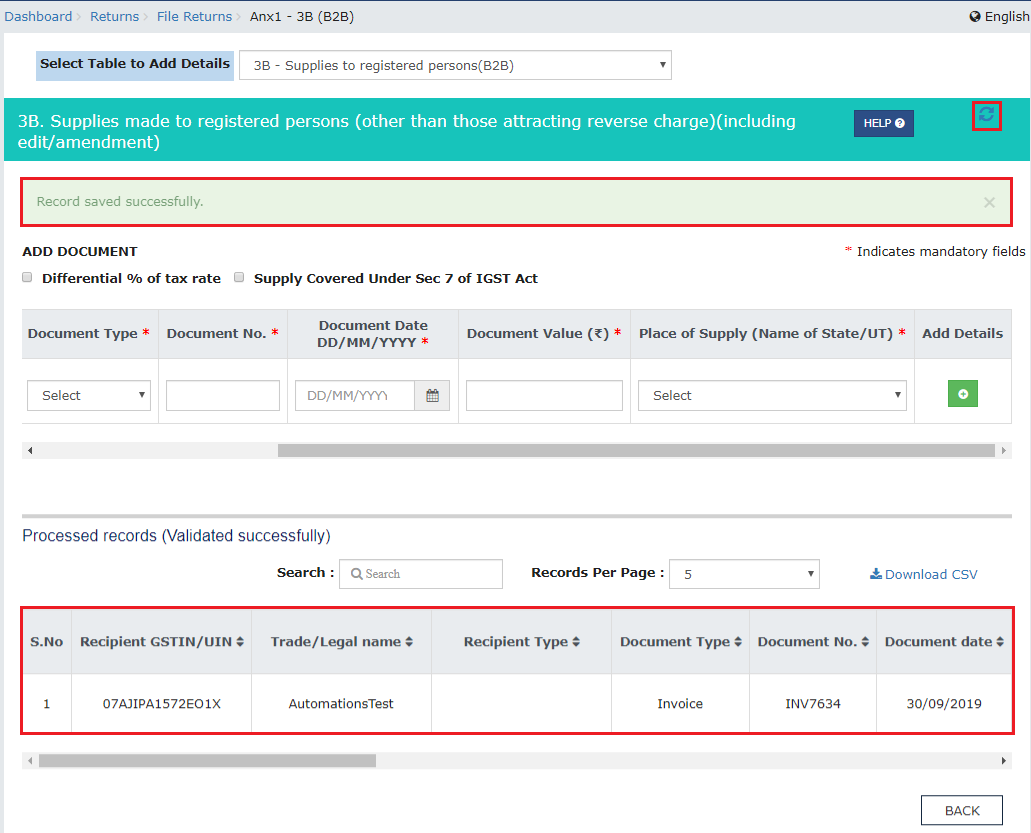
- Once you click Save Document, you will see a success message for completing the save request.
The details of document will be further validated by GST Portal and will be added to the Pending Records table till such validation is completed. Post successful validation, document gets added into the Processed records (Validated successfully) section of this page.
-
You may refresh the page to see the most updated status of documents. In case the documents are processed with error, it would be available in Pending Records table with status as Processed with error.
-
You may click Edit to see the error and correct the same.
Note:
-
Status of the uploaded records are updated to Uploaded.
-
You can click the Edit/ Delete icons under the Actions column to edit or delete the details once added.
-
To search in the list of the added records, enter the relevant text/value in the Search field and click the Search icon.
-
To view records per page, select the required number from the drop-down list of Record Per Page field.
-
You can click the Download as CSV link to download the added details in CSV format.

- Once you have added details in Table – 3B, navigate back to ANX 1 Dashboard to see consolidated summary or select another table from drop-down list to add details.
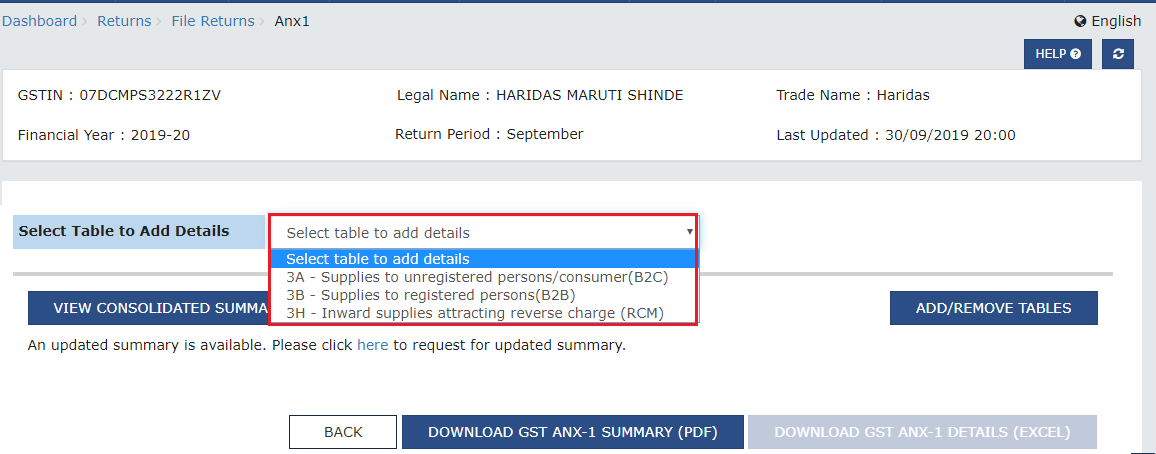
Following tables have been part of the Beta release, as on date (10th September, 2019)
| S.No. | Table Name | Point to Be Noted | Applicable For |
|---|---|---|---|
| 1. | 3A- Supplies to unregistered persons/consumers (B2C) |
|
|
| 2. | 3B- Supplies to registered persons (B2B) |
|
|
| 3. | 3H- Inward supplies attracting reverse charge (RCM) |
|
|
Following tables will be part of subsequent Beta releases.
| S.No. | Table Name | Point to Be Noted | Applicable For |
|---|---|---|---|
| 1. | 3C & 3D- Exports with/without payment of tax (EXP) |
|
|
| 2. | 3E & 3F- Supplies to SEZ with/without payment of tax (SEZ) |
|
|
| 3. | 3G- Deemed exports (DE) |
|
|
| 4. | 3I- Import of services (IMPS) |
|
|
| 5. | 3J- Import of goods (IMPG) |
|
|
| 6. | 3K- Import of goods from SEZ units/developers (IMPG SEZ) |
|
|
| 7. | 4- Supplies made through e-commerce operators |
|
|
View ANX 1 Consolidated Summary
-
Navigate BACK to go to the ANX 1 Dashboard page
-
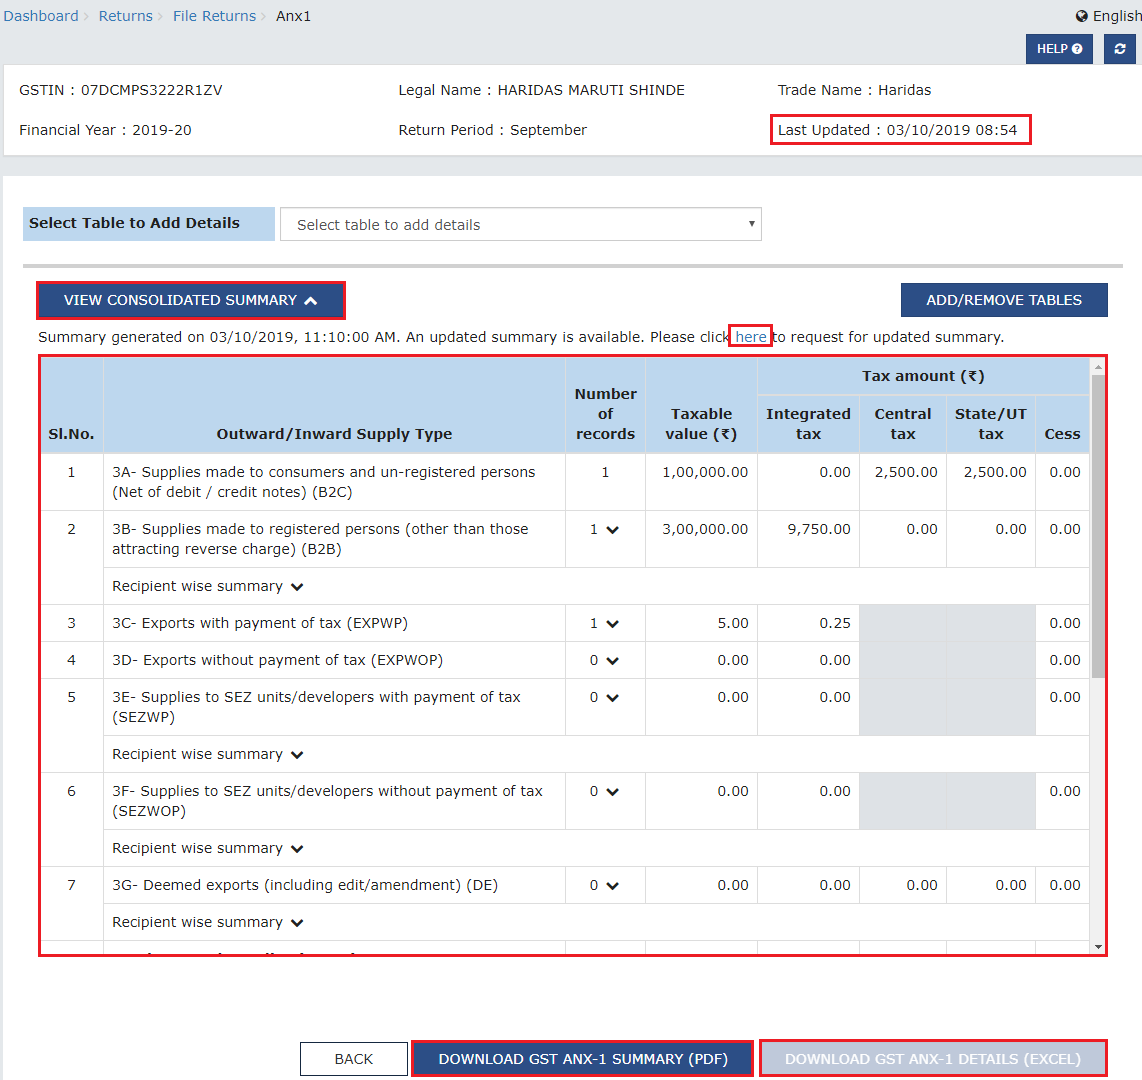
Click View Consolidated Summary to see the available consolidated summary of complete Form GST ANX 1.
In this case, the available summary is not the most updated summary; a message is shown indicating the same. Click on the here link present in the message to generate the updated summary. Updated summary is generated and summary generation date and time is reflected on the screen.
Download ANX 1 PDF / Excel
- Click the Download GST ANX 1 Summary (PDF) OR Download GST ANX 1 Details (EXCEL) button for GST ANX 1 PDF download or GST ANX 1 Excel download
- Navigate Back to go back to the New Return (Trial) page.
Once details are uploaded in Form GST ANX 1, you do not need to file Form GST ANX 1. Form GST ANX 1 will be deemed filed along with filing of return for the period. Documents uploaded by Supplier in Form GST ANX 1 are reflected on a real time basis in Form GST ANX 2.