Filing Application for Restoration of Provisional Attachment
How can I file an application for restoration of provisional attachment?
To file an application for restoration of provisional attachment, perform following steps:
A. File an Application for Restoration of Provisional Attachment
B. Open the Application’s Case Details screen by searching for your filed Application in My Applications page or from View Additional Notices/Orders page
C. Take action using APPLICATIONS tab of Case Details screen: View your Filed Application
D. Take action using NOTICES tab of Case Details screen: View issued Notice related to that Application
E. Take action using REPLIES tab of Case Details screen: View/Add your replies to the issued Notice related to that Application
F. Take action using ORDERS tab of Case Details screen: View issued Orders related to that Application
A. File an Application for Restoration of Provisional Attachment
To file an Application for Restoration of Provisional Attachment, perform following steps:
1) Access the http://www.gst.gov.in URL. The GST Home page is displayed.
2) Login to the portal with valid credentials.
3) Dashboard page is displayed. Click Services > User Services > My Applications option.

4) The My Applications page is displayed.

5) Select “Application for Restoration of Provisional Attachment” in the Application Type field.
6) Click the NEW APPLICATION button.

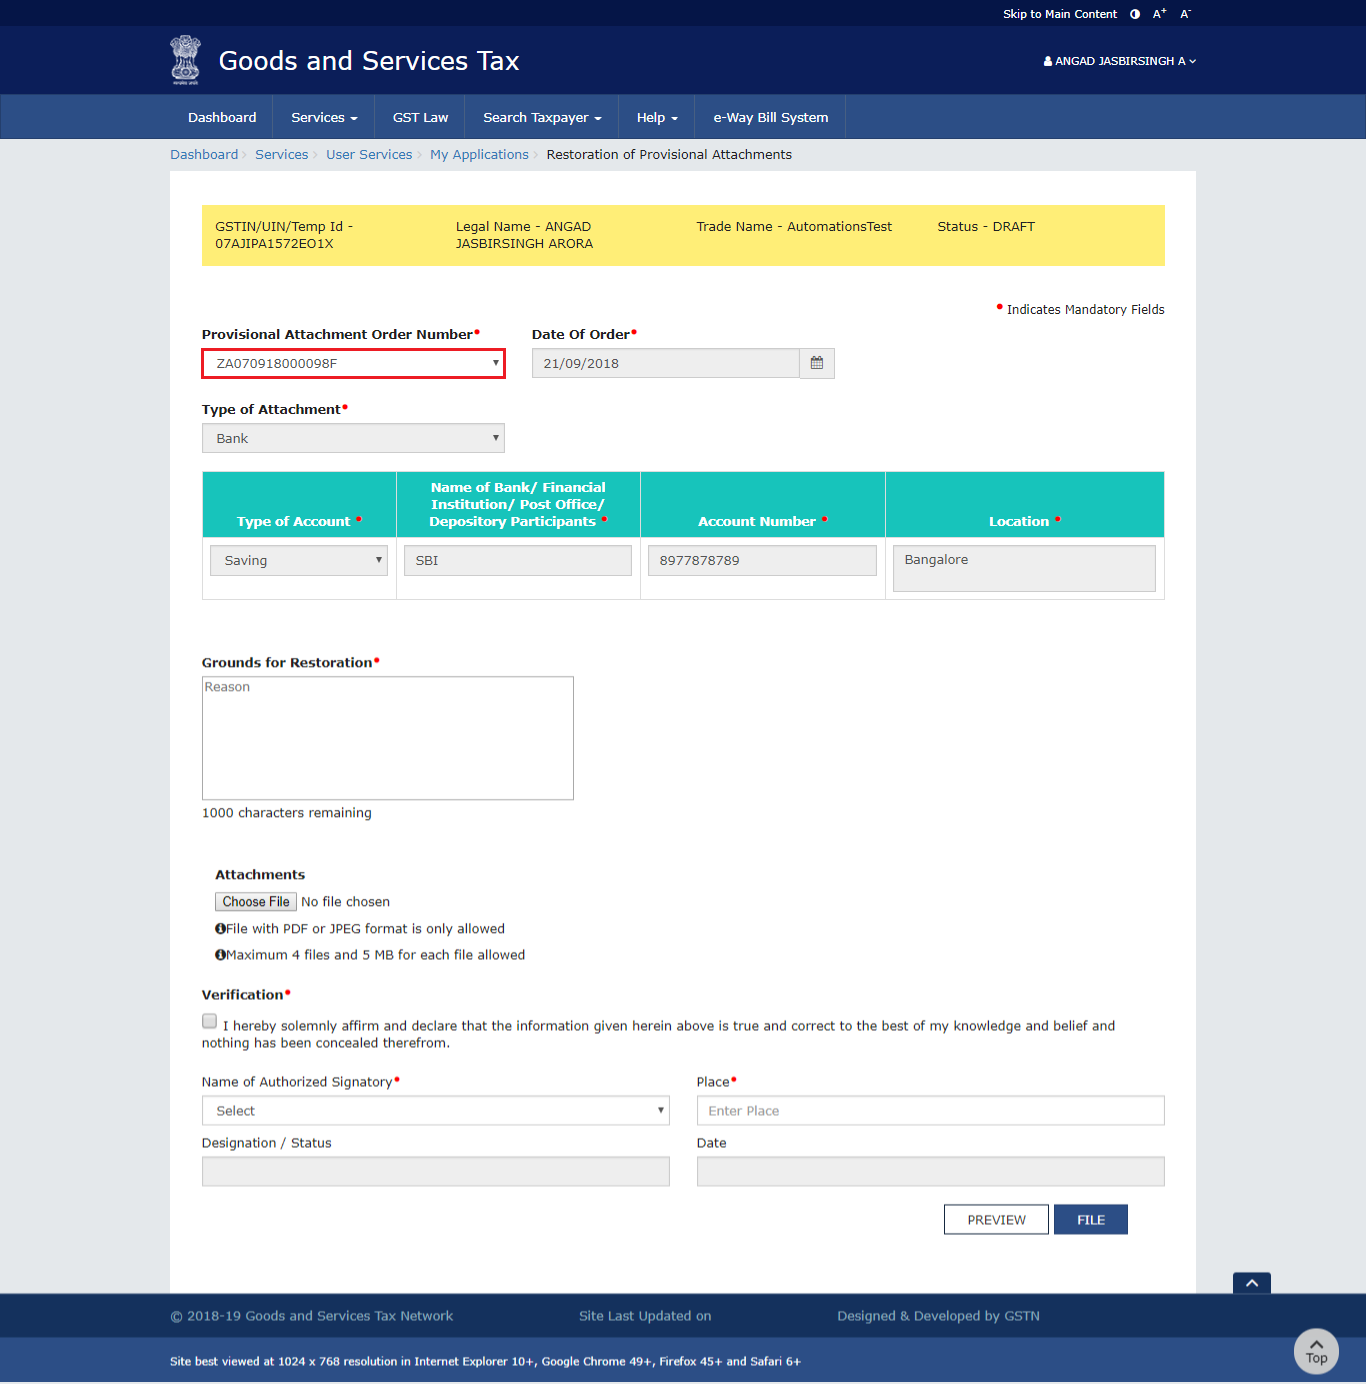
7) The Restoration of Provisional Attachments page is displayed.

8) Select the Provisional Attachment Order Number from the drop-down list. Based on your selection, Date of Order, Type of Attachment and attachment details fields get auto-populated.
1Select Provisional Attachment Order Number
9) In Grounds for Restoration field, enter reason for filing this application for restoration of provisional attachment.
10) Click Choose File to upload the document(s) related to this application, if any. This is not a mandatory field.
Note: You can upload file with PDF or JPEG format with maximum 4 files of 5 MB for each file.
11) Select the Verification check-box.
12) Select the Name of the Authorized Signatory from the drop-down list.
13) Enter the name of the Place where you are filing this application.
14) Click PREVIEW to download and review your application.

15) The application is downloaded in PDF format.

16) Once you are satisfied, click the FILE button.

17) The Submit Application page is displayed. Click SUBMIT WITH DSC or SUBMIT WITH EVC.

SUBMIT WITH DSC:
a. Click the PROCEED button.
b. Select the certificate and click the SIGN button.
SUBMIT WITH EVC:
Enter the OTP sent on email and mobile number of the Authorized Signatory registered at the GST Portal and click the VERIFY button.

18) The Acknowledgement page is displayed with the generated ARN. You will also receive an SMS and email on your registered mobile number & email id respectively, intimating you of the generated ARN and successful filing of the application.
To download the filed application, click the Click here hyperlink or click CREATE NEW APPLICATION to go back to My Applications page.

Note: Once the application is filed, Status of the application gets updated to “Pending for action by tax officer”.
C. Take action using APPLICATIONS tab of Case Details screen: View your Filed Application
To view Application Details, based on which this Case was created, perform following steps:
1) Navigate to Services > User Services > View Additional Notices/Orders option.

2) Click View.

3) On the Case Details page of that particular application, select the APPLICATIONS tab, if it is not selected by default. This tab provides you an option to view the filed application in PDF mode.
4) Click the View hyperlink to download and view the application in PDF mode.

D. Take action using NOTICES tab of Case Details screen: View issued Notice related to that Application
To view issued Notices and File your Reply, perform following steps:
1) On the Case Details page of that particular application, select the NOTICES tab. This tab displays all the notices (Additional Information/Adjournment) issued by Tax Official.

2) Scroll to the right to view the document name(s) in the Attachments section of the table and click them to download into your machine.
 : .center-block .img-fluid .cz-img-border .image-process-container-col-sm-9 }
E. Take action using REPLIES tab of Case Details screen: View/Add your replies to the issued Notice related to that Application
To view or add your replies to the issued Notice of that Application, perform following steps:
1) On the Case Details page of that particular application, select the REPLIES tab. This tab will display the replies you will file or already file reply against the Notice issued by Tax Official. To add a reply, click ADD REPLY and select Additional Information.

2) Additional Information page is displayed. The Type, Date of Notice and Reference Number fields are auto populated.
Enter details in the displayed fields as mentioned in the following steps. To go to the previous page, click BACK.

3) In the Personal Hearing Required? field, select Yes or No.
Note: This button is visible in only those applications where the Tax Official has not already called for a personal hearing in the issued notice.
4) In Reply field, enter details of your reply to the issued notice.
5) Click Choose File to upload the document(s) related to your reply, if any. This is not a mandatory field.
6) Enter Verification details. Select the declaration check-box and select the name of the authorized signatory. Based on your selection, the fields Designation/Status and Date (current date) displayed below gets auto-populated. Enter the name of the place where you are filing this application.
7) Click PREVIEW to download and review your application.

8) The application is downloaded in PDF format.

9) Once you are satisfied, click FILE.

10) Submit Application page is displayed. Click SUBMIT WITH DSC or SUBMIT WITH EVC.

SUBMIT WITH DSC:
a. Click the PROCEED button.
b. Select the certificate and click the SIGN button.
SUBMIT WITH EVC:
Enter the OTP sent on email and mobile number of the Authorized Signatory registered at the GST Portal and click the VERIFY button.

11) Notices and Orders page is displayed with the generated Reference number. To download the filed reply, click the Click here hyperlink. Then, click OK.

12) The updated REPLIES tab is displayed, with the record of the filed reply in a table and with the Status updated to “Reply furnished, Pending for order”. You can also click the documents in the Attachments section of the table to download them.

F. Take action using ORDERS tab of Case Details screen: View issued Orders related to that Application
To download order for restoration of provisional attachment, perform following steps:
1) On the Case Details page of that particular taxpayer, click the ORDERS tab. This tab provides you an option to view the issued order, with all its attached documents, in PDF mode.
2) Click the document(s) in the Attachments section of the table to download them.
