GSTR-9A Offline Utility
Overview
GSTR-9A Offline utility is an Excel-based tool to facilitate the creation of annual return in Form GSTR-9A, which is to be filed on the GST portal by taxpayers who have opted for composition scheme, for any period during the said financial year.
Taxpayers may use the offline utility to furnish details regarding outward supplies, inward supplies, taxes paid, any refund claimed or demand created or input tax credit availed or reversed due to opting out or opting in to composition scheme.
Details for following Tables of GSTR-9A can be entered by taxpayer using the offline Tool:
-
Table 6: Details of outward supplies made during the financial year
-
Table 7: Details of inward supplies on which tax is payable on reverse charge basis (net of debit/credit notes) for the financial year
-
Table 8: Details of other inward supplies for the financial year
-
Table 9: Details of tax paid as declared in returns filed during the financial year
-
Table 10: Supplies / tax (outward) declared through amendments (+) (net of debit notes)
-
Table 11: Inward supplies liable to reverse charge declared through amendments (+) (net of debit notes)
-
Table 12: Supplies / tax (outward) reduced through amendments (-) (net of credit notes)
-
Table 13: Inward supplies liable to reverse charge reduced through amendments (-) (net of credit notes)
-
Table 14: Differential tax paid on account of declaration made in 10,11,12 & 13 above
-
Table 15: Particulars of Demands and Refunds
-
Table 16: Details of credit reversed and availed
Once return is prepared using offline utility, it is to be uploaded on GST Portal by creating a JSON file and then you can make payment of late fees, sign it and file it.
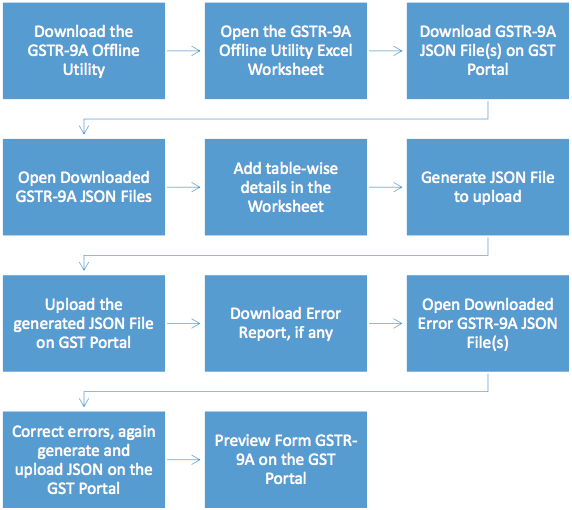
To Prepare Annual Return in Form GSTR-9A using offline utility, perform following steps:
-
A. Download the GSTR-9A Offline Utility
-
B. Open the GSTR-9A Offline Utility Excel Worksheet
-
C. Download GSTR-9A JSON File(s) on GST Portal
-
D. Open Downloaded GSTR-9A JSON Files
-
E. Add table-wise details in the Worksheet
-
F. Generate JSON File to upload
-
G. Upload the generated JSON File on GST Portal
-
H. Preview Form GSTR-9A on the GST Portal
-
I. Download Error Report, if any
-
J. Open Downloaded Error GSTR-9A JSON File(s)
To know about the following steps of filing GSTR-9A on the GST Portal, please refer to GSTR-9A Online Manual:
-
K. Compute Liabilities and Pay Late Fees (If any)
-
L. File Form GSTR-9A with DSC/EVC
-
M. Download Filed Return
Downloading GSTR-9A Offline Tool and Uploading GSTR-9A details
A. Download the GSTR-9A Offline Utility
To download the GSTR-9A Offline Utility, perform following steps:
Downloading the GSTR-9A Offline utility is a one-time activity. However, the utility may get updated in future. So, always use the latest version available on the GST Portal.
1) Access the www.gst.gov.in URL. The GST Home page is displayed.
2) Click the Downloads > Offline Tools > GSTR-9A Offline Tool option.
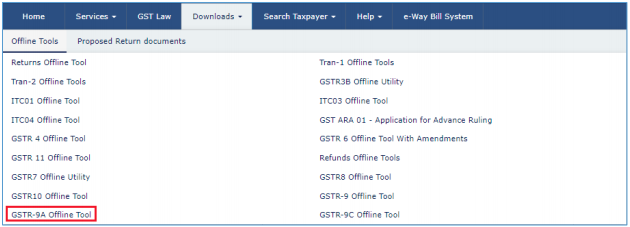
You can download the GSTR-9A Offline Utility from the Portal without logging in to the GST Portal.
3) GSTR-9A Offline Utility page is displayed. Click the Download hyperlink.
Make sure you carefully read the Important message and System Requirement details displayed on the page.

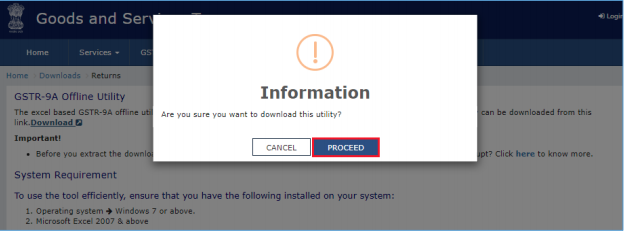
4) An Information popup opens. Click PROCEED.
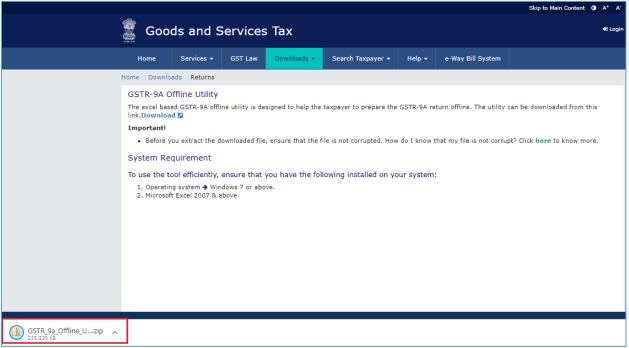
5) Zipped GSTR-9A Offline Utility folder gets downloaded.
B. Open the GSTR-9A Offline Utility Excel Worksheet
To open the downloaded GSTR-9A Offline Utility Excel Worksheet, perform following steps:
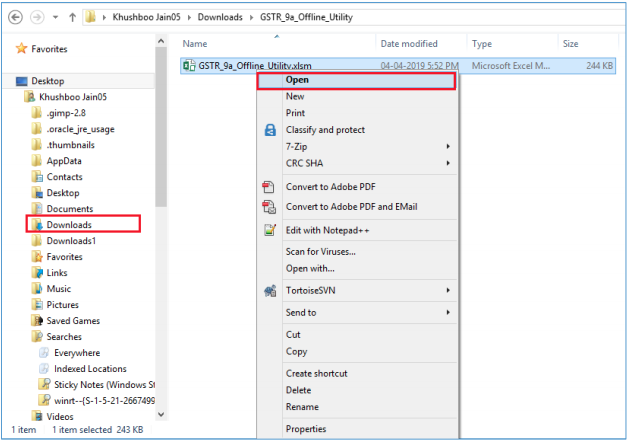
1) Extract the files from the downloaded zipped folder GSTR_9A_Offline_Utility.zip and you will see GSTR_9A_Offline_Utility excel file in the unzipped folder. Right-click and click Open.
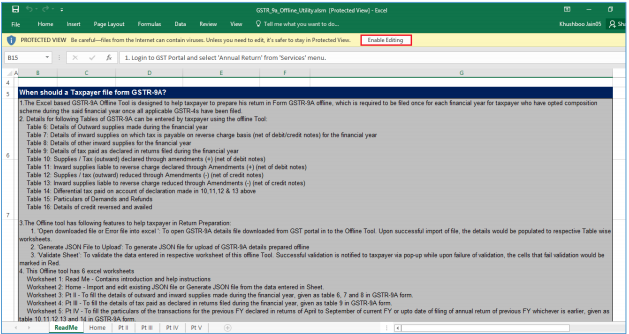
2) Click Enable Editing.
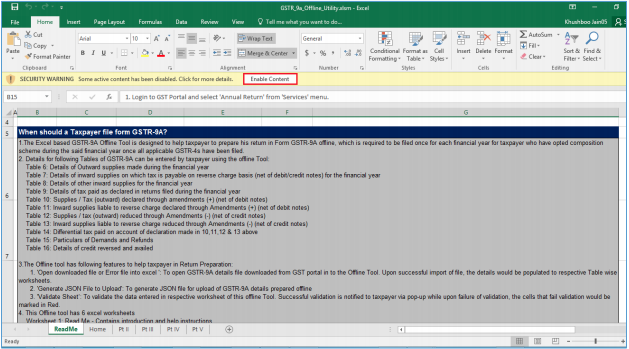
3) Click Enable Content. Then, click the Read Me tab.
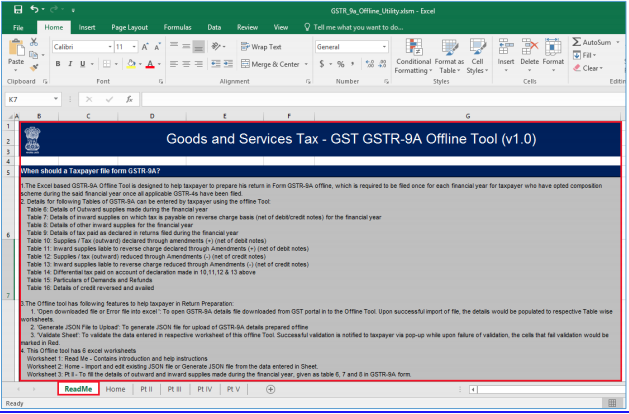
The Worksheet comprises of 6 tabs— Read Me, Home, Pt II, Pt III, Pt IV and Pt V.
4) Read Me page is displayed. It contains introduction and help instructions. Scroll down to read all the instructions carefully. Once you have completed your reading, you can now proceed to enter details in the worksheet.
C. Download GSTR-9A JSON File(s) from the GST Portal
This step is to be done by you to download and to open the system-computed Form GSTR-9A data based on filed Form GSTR-4 in the Offline Tool. Data so downloaded can be edited and can be used to prepare details of Table 6 to Table 16 of Form GSTR-9A for upload on the GST Portal.
To download the generated JSON File from the GST Portal, perform following steps:
1) Access the www.gst.gov.in URL. The GST Home page is displayed.
2) Login to the portal with valid credentials.
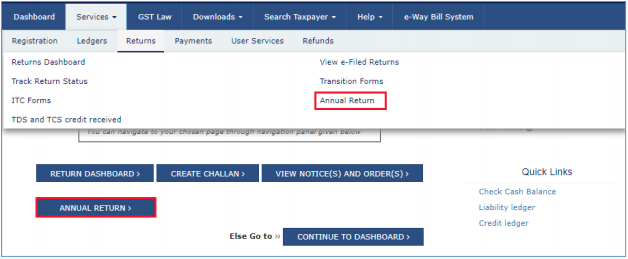
3) Dashboard page is displayed. Click the Services > Returns > Annual Return command.
Alternatively, you can also click the Annual Return link on the Dashboard.
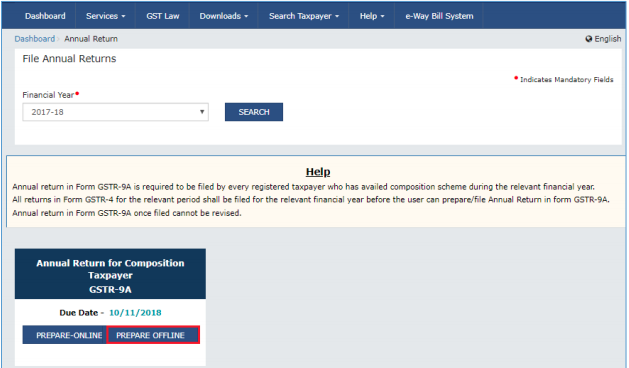
4) The File Annual Returns page is displayed. Select the Financial Year for which you want to file the return from the drop-down list.
5) Click the SEARCH button.

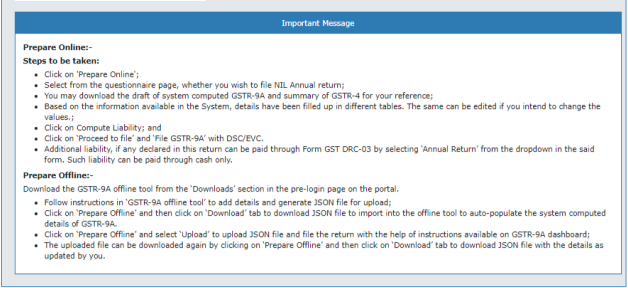
6) The GSTR-9A tile is displayed, with an Important Message box on the bottom. In the GSTR9A tile, click the PREPARE OFFLINE button.
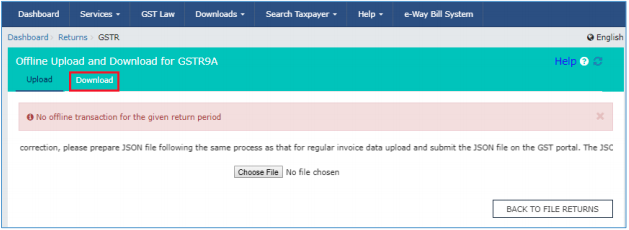
7)The Upload section of the Offline Upload and Download for GSTR-9A page is displayed, by default. Click the Download section.
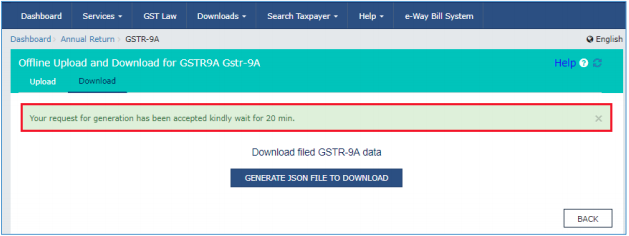
8) Click the GENERATE JSON FILE TO DOWNLOAD button.

9) A message is displayed that “Your request for generation has been accepted kindly wait for 20 min”.
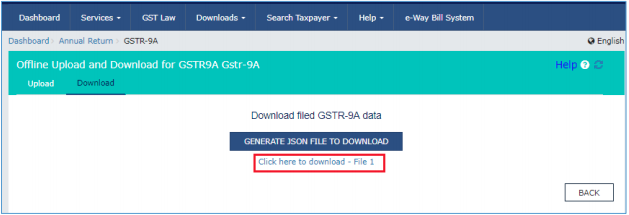
10) Once the JSON file is downloaded, click the “Click here to download – File 1” link.
11) The generated JSON file is downloaded. Generated JSON file contains the systemcomputed Form GSTR-9A data based on filed Form GSTR-4 for editing in the Offline Tool.
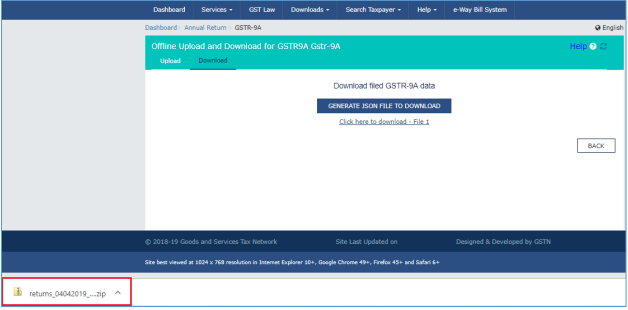
12) Unzip the downloaded file which contain the generated JSON file.

D. Open Downloaded GSTR-9A JSON File(s)
To open the downloaded GSTR-9A JSON File, to view & edit the system-computed Form GSTR9A data, based on filed Form GSTR-4 and to prepare details of Table 6 to Table 16 of Form GSTR-9A in the Offline Tool, perform following steps:
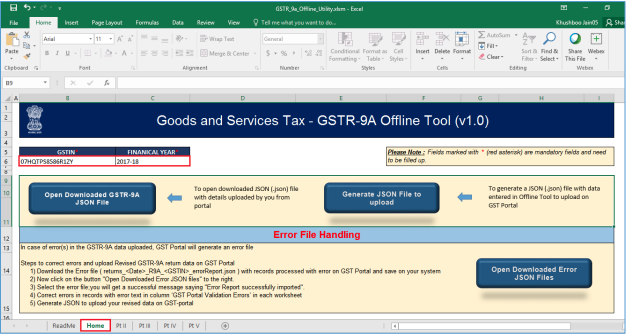
1) Go to the Home tab and enter your GSTIN and Financial Year (select from the drop-down list) for which you want to file Form GSTR-9A.
Note:
-
Generate JSON file, for upload of GSTR-9A return details prepared offline on GST portal, using Generate JSON File to upload button.
-
Import and open Error JSON File downloaded from GST portal using Open Downloaded Error JSON Files button.
-
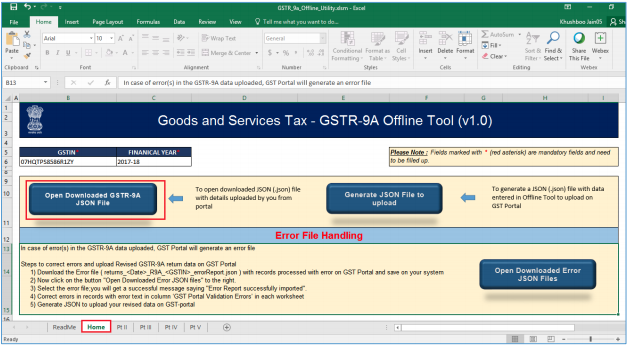
Import and open JSON File downloaded from GST portal using Open Downloaded GSTR-9A JSON File button.
2) Click the Open Downloaded GSTR-9A JSON File button.
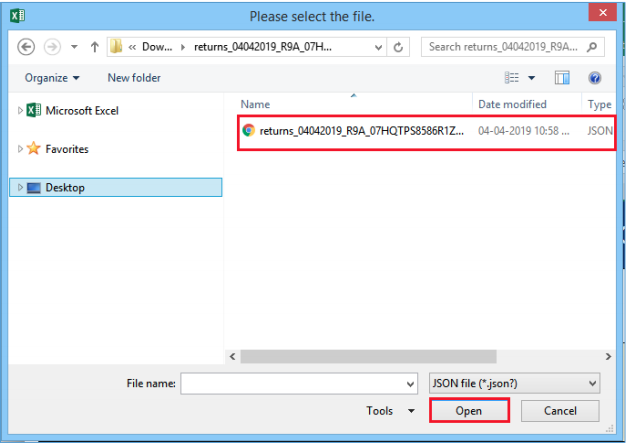
3) Browse the JSON(.json) file and click the Open button.
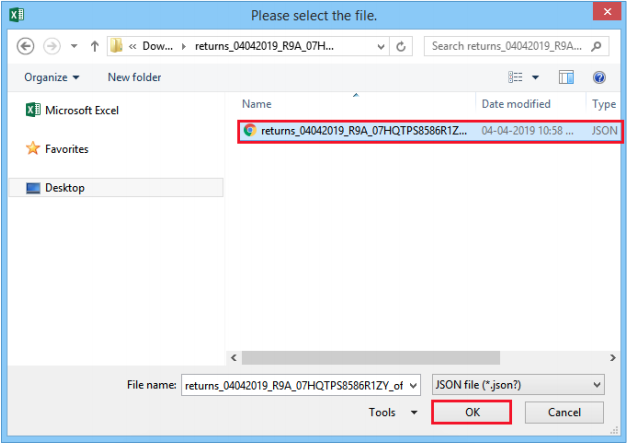
4) Select the downloaded JSON (. JSON) file and click on OK to proceed.
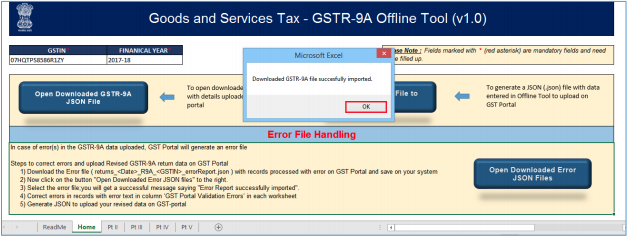
5) Success message is displayed. Click the OK button to proceed.
6) Now all the entries that were auto filled in relevant fields of different tables of Form GSTR 9A, based on filed Form GSTR-4, would be auto-populated in the respective sheets in the offline tool. Next, you need to add or edit table-wise details in the Worksheet, which is explained below.
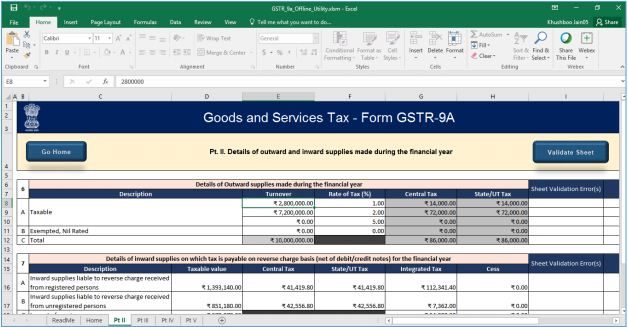
E. Add table-wise details in the Worksheet
Note: For preparing details in Offline Utility, you will have two options:
-
Either download the utility from GST Portal and fill up required details, create JSON and then upload on the GST Portal
-
Download the JSON file from the Portal containing system computed details of Form
GSTR-9A and import it/ open it into the offline tool and then edit it. All the entries will be editable except tax paid in Table 9 which will be prefilled and non-enterable.
To add table-wise details in the Worksheet, perform following steps:
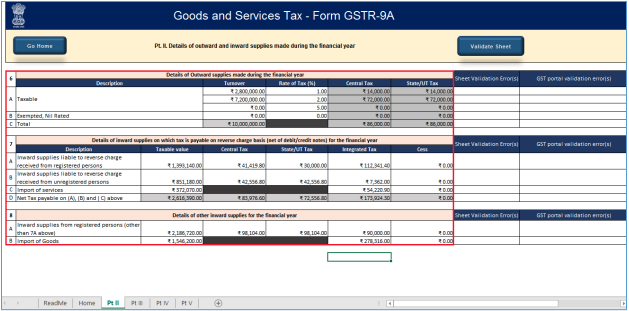
1) Go to the Pt II tab and enter details of Outward supplies made during the financial year, details of inward supplies on which tax is payable on reverse charge basis (net of debit/credit notes) for the financial year and details of other inward supplies for the financial year.
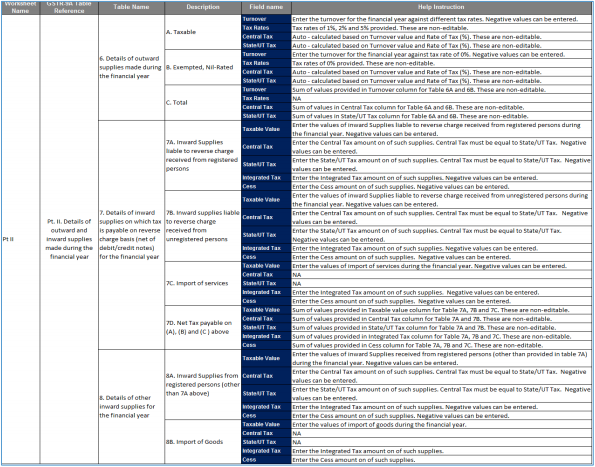
Note: The table below provides the worksheet name, table name and detailed description for this worksheet.
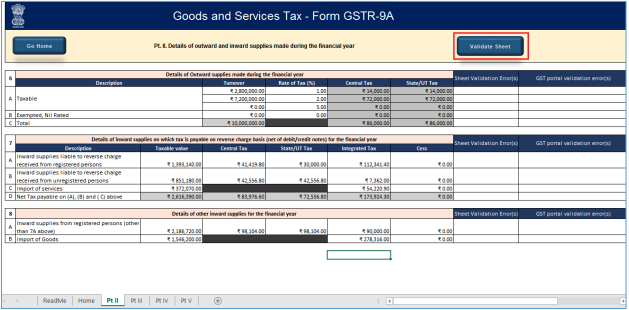
2) Once the details are entered, click the Validate Sheet button.
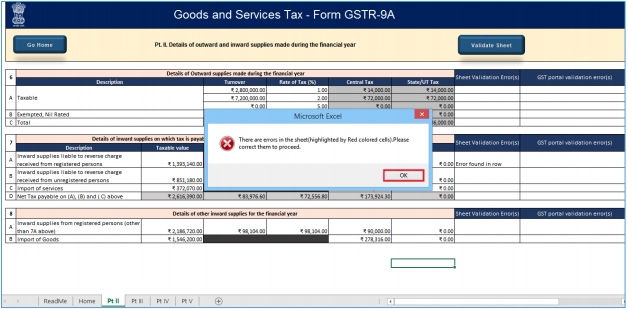
3) In case of unsuccessful validation, error-intimation popup will appear and the cells with error will be highlighted. Close the popup by clicking OK.
4) The comment box for each cell, that has errors, will show the error message. The user can read the error description of each cell and correct the errors as mentioned in the description box.
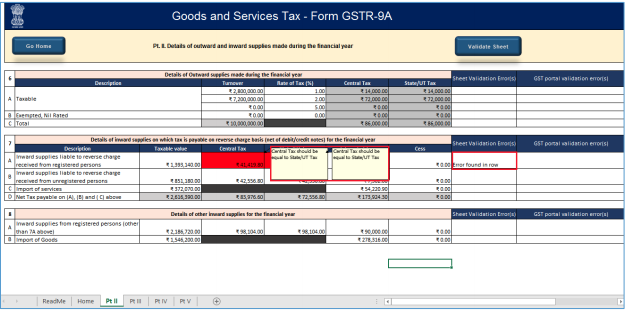
Alternatively, click the Review ribbon-tab > Show All Comments link to view the comments for fields with errors.

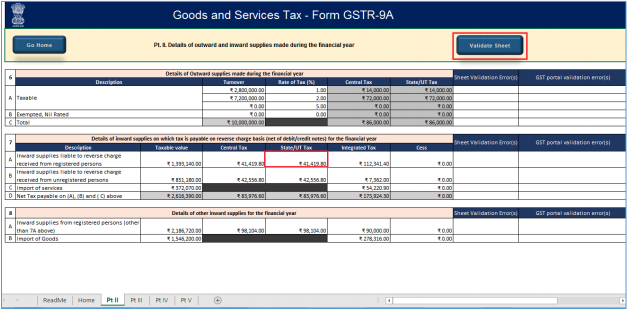
5) After you have corrected all the errors, again click the Validate Sheet button.
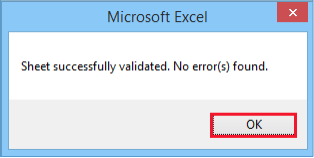
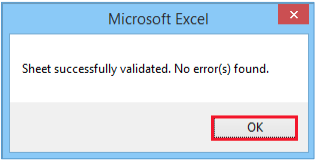
6) A popup Message box appears “Sheet successfully validated. No error(s) found”. Click OK.
7) Go to the Pt III tab and enter details of tax paid as declared in returns filed during the financial year.

Note: The table below provides the worksheet name, table name and detailed description for this worksheet.
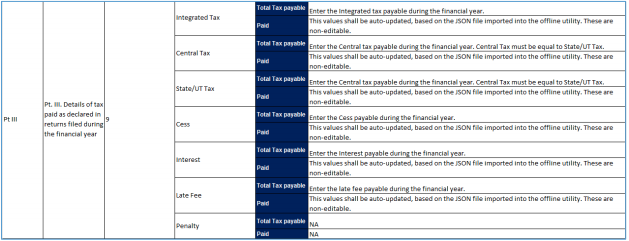
8) Once the details are entered, click the Validate Sheet button. In case of any errors, follow the steps as mentioned above to correct the errors.

9) A popup Message box appears “Sheet Successfully Validated. No error(s) found. Click OK.
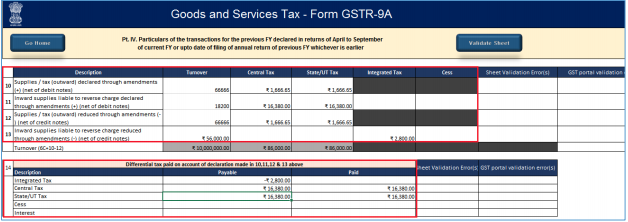
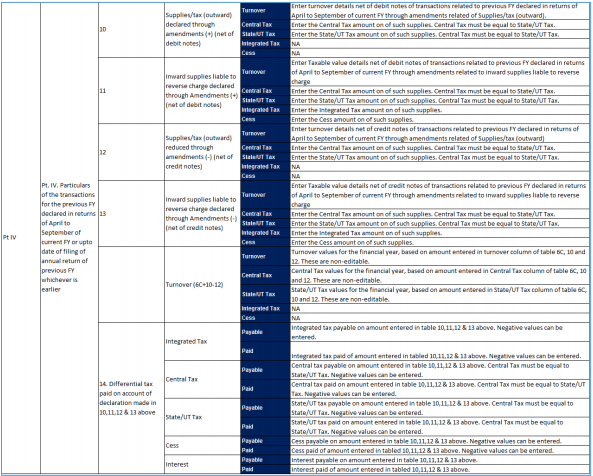
10) Go to the Pt IV tab and enter Particulars of the transactions for the previous FY declared in returns of April to September of current FY or upto date of filing of annual return of previous FY whichever is earlier.
Note: The table below provides the worksheet name, table name and detailed description for this worksheet.
11) Once the details are entered, click the Validate Sheet button. In case of any errors, follow the steps as mentioned above to correct the errors.
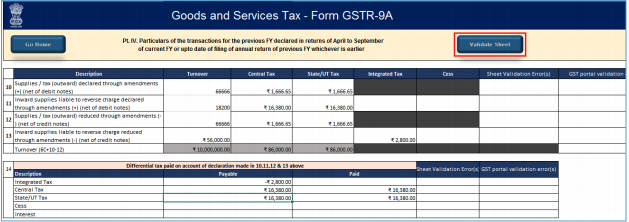
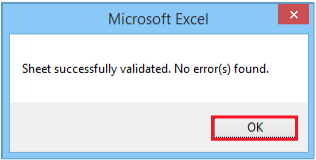
12) A popup Message box appears “Sheet Successfully Validated. No error(s) found. Click OK.
13) Go to the Pt V tab and enter Particulars of Demands and Refunds and details of credit reversed or availed for the relevant financial year of which the return is being filed.

Note: The table below provides the worksheet name, table name and detailed description for this worksheet.
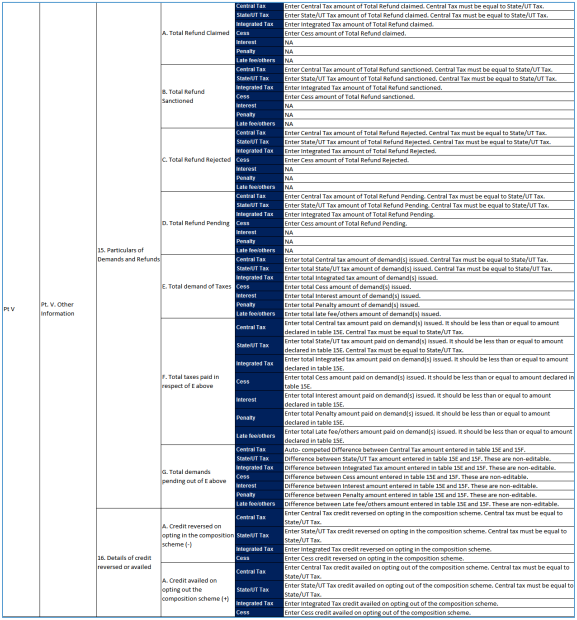
14) Once the details are entered, click the Validate Sheet button. In case of any errors, follow the steps as mentioned above to correct the errors.

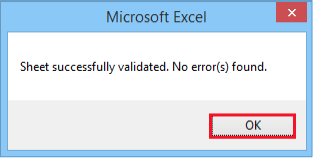
15) A popup Message box appears “Sheet Successfully Validated. No error(s) found. Click Ok.
F. Generate JSON File to upload
To generate JSON File to upload, perform following steps:
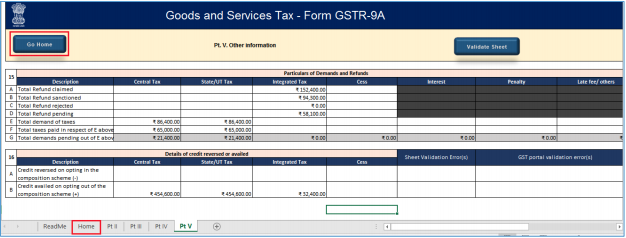
1) From the tab you are on, go to the ‘Home’ sheet by either clicking the ‘Go Home’ button or clicking the ‘Home’ sheet.
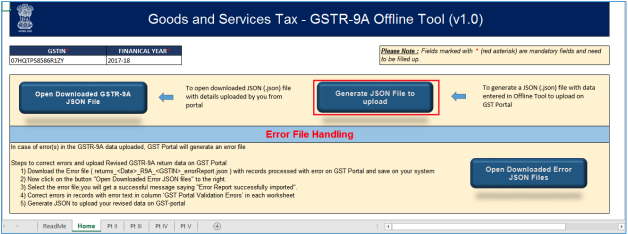
2) Click the Generate JSON File to upload button.
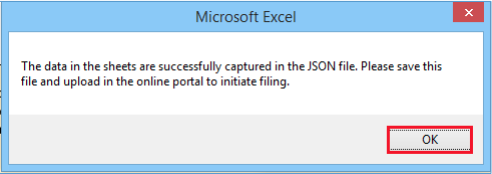
3) A success message is displayed that “data in the sheets are successfully captured in the JSON file. Please save this file and upload in the online portal to initiate filing.”
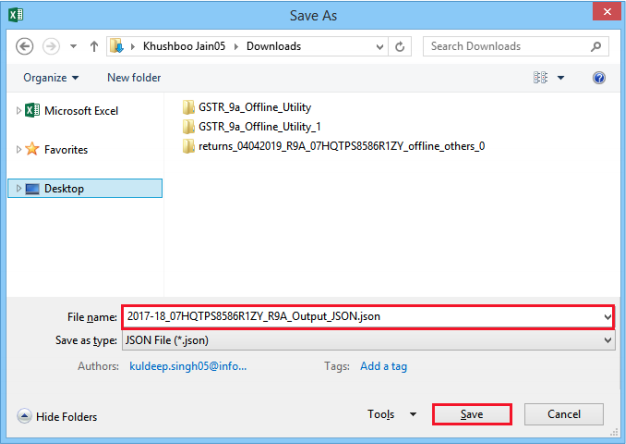
4) A Save As pop-up window appears. Select the location where you want to save the JSON file, enter the file name and click the SAVE button.
G. Upload the generated JSON File on GST Portal
To upload the generated JSON File on the GST Portal, perform following steps:
1) Access the www.gst.gov.in URL. The GST Home page is displayed.
2) Login to the portal with valid credentials.
3) Dashboard page is displayed. Click the Services > Returns > Annual Return command. Alternatively, you can also click the Annual Return link on the Dashboard.
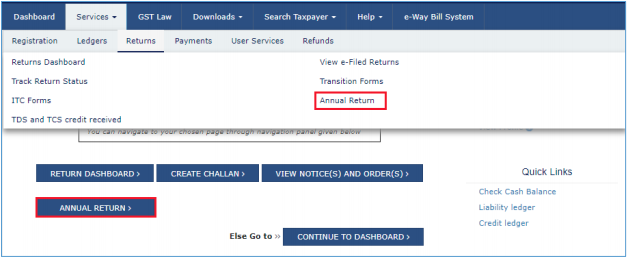
4) The File Annual Returns page is displayed. Select the Financial Year for which you want to file the return from the drop-down list.
5) Click the SEARCH button.

6) The GSTR-9A tile is displayed, with an Important Message box on the bottom. In the GSTR9A tile, click the PREPARE OFFLINE button.
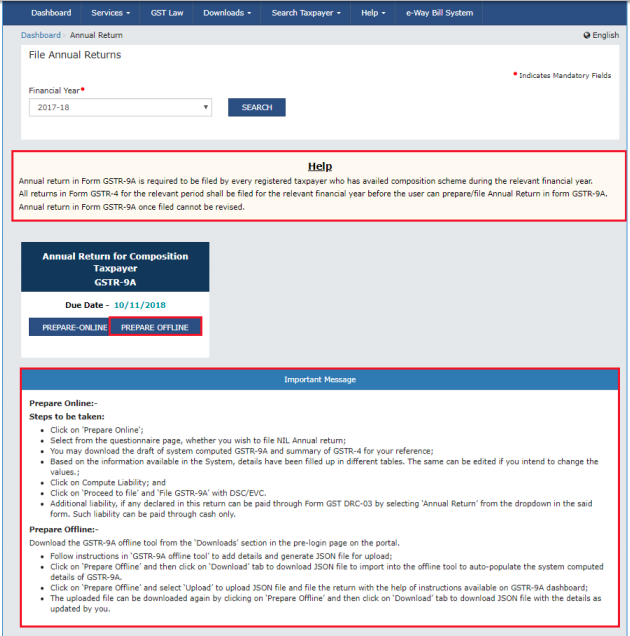
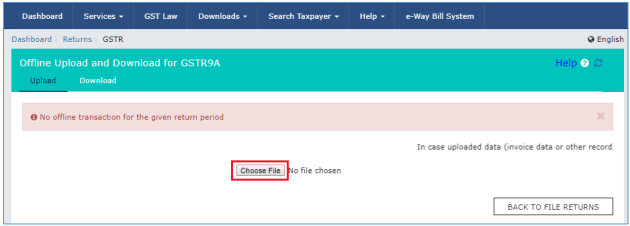
7) The Upload section of the Offline Upload and Download for GSTR-9A page is displayed. Click the Choose File button.
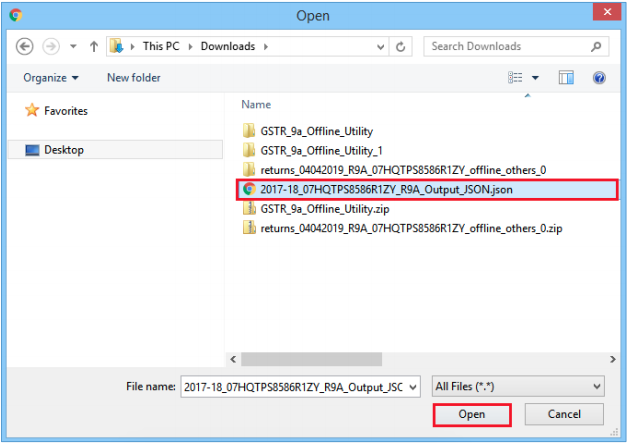
8) Browse and navigate the JSON file to be uploaded from your computer. Click the Open button.
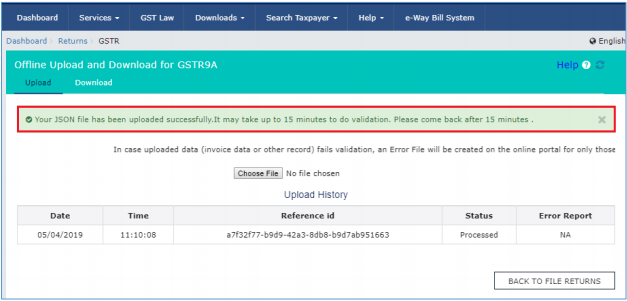
9) The Upload section page is displayed. A green message appears confirming successful upload and asking you to wait while the GST Portal validates the uploaded data. And, below the message, is the Upload History table showing Status of the JSON file uploaded so far.
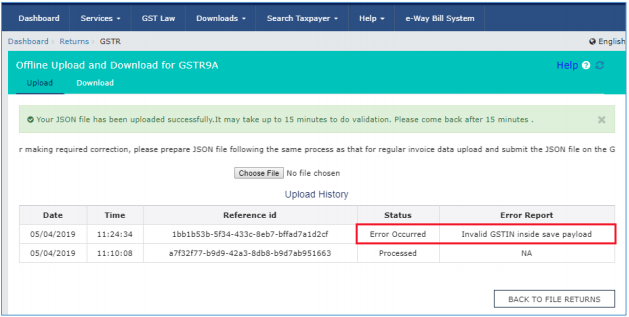
10) In case, there was some error in data uploaded, like Invalid GSTIN etc. then the Upload History table will show the Status of the JSON file as “Error Occurred”. Rectify the error and upload the JSON file again by following the steps mentioned in the hyperlink to download error report, if any: Download Error Report, If any
H. Preview Form GSTR-9A on the GST Portal
To preview Form GSTR-9A on the GST Portal, perform following steps:
1) Access the www.gst.gov.in URL. The GST Home page is displayed.
2) Login to the portal with valid credentials.
3) Dashboard page is displayed. Click the Services > Returns > Annual Return command.
Alternatively, you can also click the Annual Return link on the Dashboard.
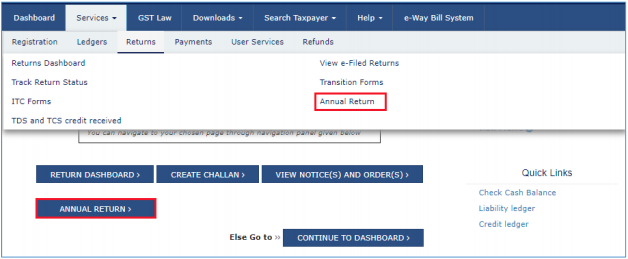
4) The File Annual Returns page is displayed. Select the Financial Year for which you want to file the return from the drop-down list.
5) Click the SEARCH button.

6) The GSTR-9A tile is displayed. In the GSTR-9A tile, click the PREPARE ONLINE button.
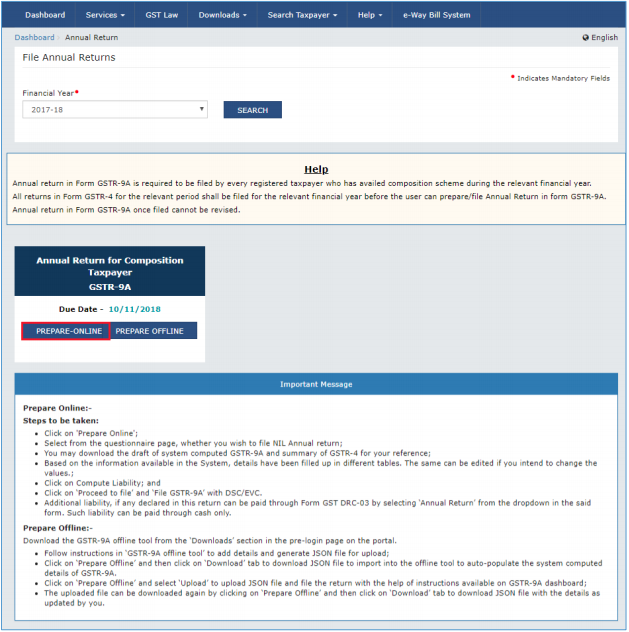
7) A question is displayed. You need to answer this question as to whether you want to file nil return for the financial year or not, to proceed further to the next screen.
Note: Nil return can be filed by you for the financial year, if you have:
-
NOT made any outward supply (commonly known as sale); AND
-
NOT received (commonly known as purchase) any goods/services; AND
-
NO other liability to report; AND
-
NOT claimed any refund; AND
-
NOT received any order creating demand; AND
-
There is no late fee to be paid etc.
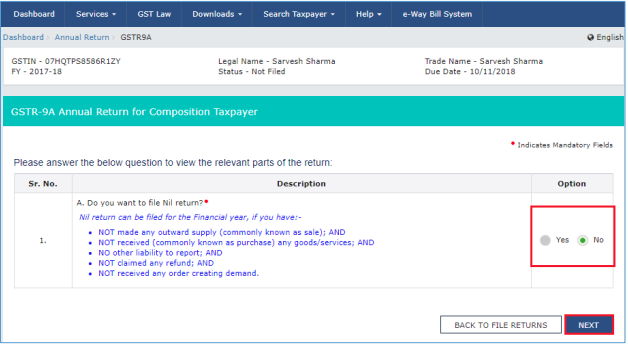
8) Click the NEXT button.
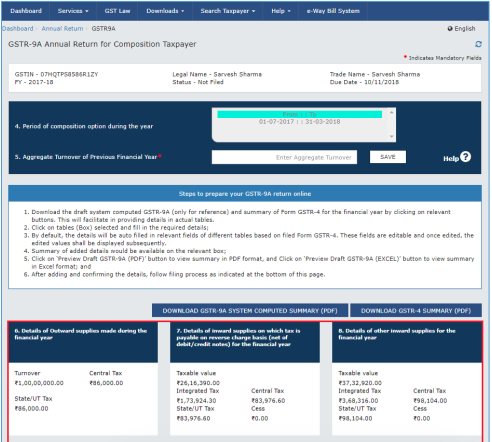
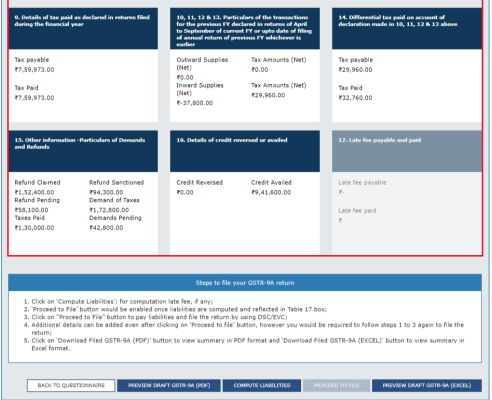
9) The GSTR-9A Annual Return for Composition Taxpayers page is displayed.
10) The details you had successfully uploaded on the portal using the Offline Utility would be displayed in Table 6 to 16.
For knowing how to proceed to file and file the GSTR-9A Return online, please follow the steps mentioned in the following hyperlink: GSTR-9A Online Manual
I. Download Error Report, if any
To download the Error report, if any, while uploading GSTR-9A JSON File for correcting entries, that failed validation on the GST portal, perform following steps:
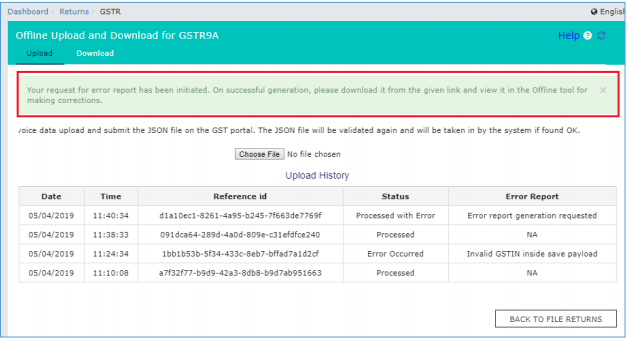
1) Error Report will contain only those entries that failed validation checks on the GST Portal. The successfully-validated entries can be previewed online. Click Generate error report hyperlink.
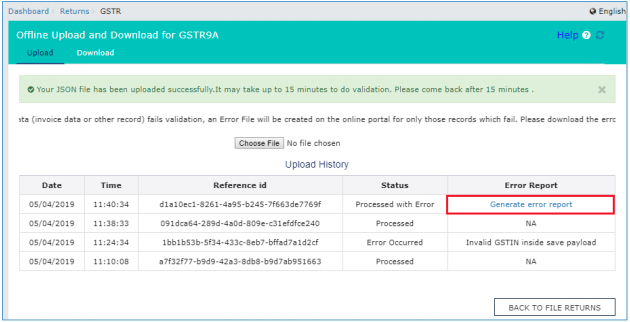
2) A confirmation-message is displayed and Columns Status and Error Report change as shown.
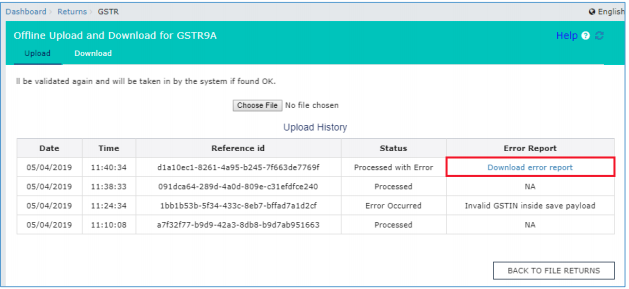
3) Once the error report is generated, Download error report link is displayed in the Column Error Report. Click the Download error report link to download the zipped error report.
4) The error JSON File is downloaded on your machine. Error Report will contain only those entries that failed validation checks on the GST portal.
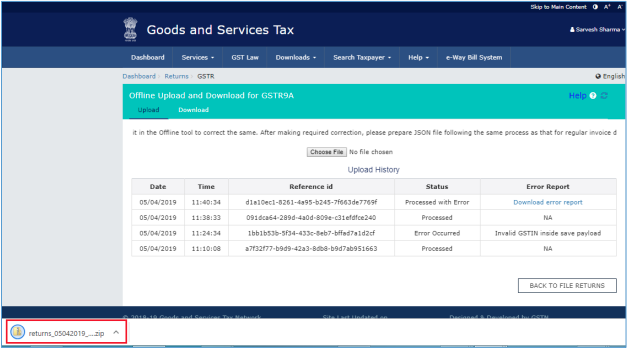
5) Unzip and save the JSON File in your machine.

6) Import the JSON file into the offline utility and make updates as necessary, as explained below.
J. Open Downloaded Error GSTR-9A JSON File(s)
To open the downloaded Error GSTR-9A JSON File for correcting entries that failed validation on the GST portal, perform following steps:
1) Open GSTR-9A Offline Utility and go to the Home tab. Under the section Error File Handling, click the Open Downloaded Error JSON Files button.
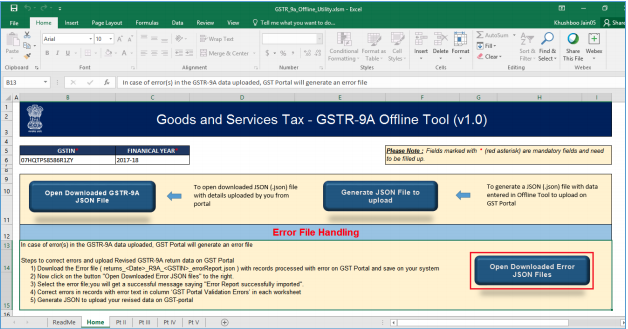
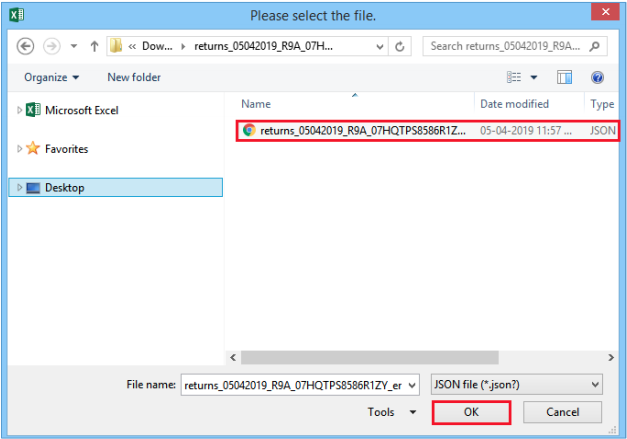
2) A file dialog box will open. Navigate to extracted error file. Select the file and click the OK button.
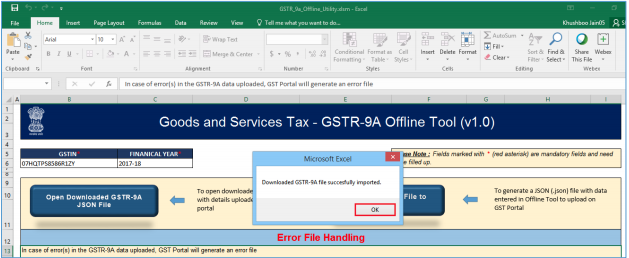
3) Success message will be displayed. Click the OK button to proceed.
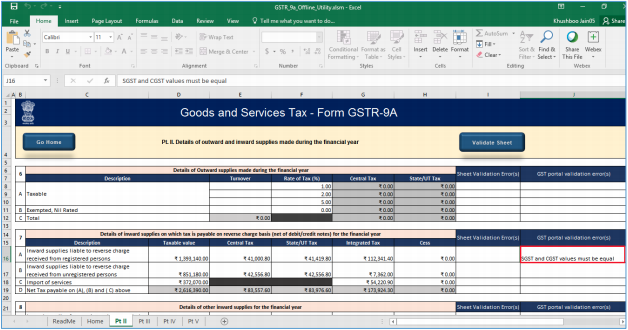
4) Navigate to individual sheets. Correct the errors, as mentioned in the column “GST Portal Validation Errors” in each sheet.
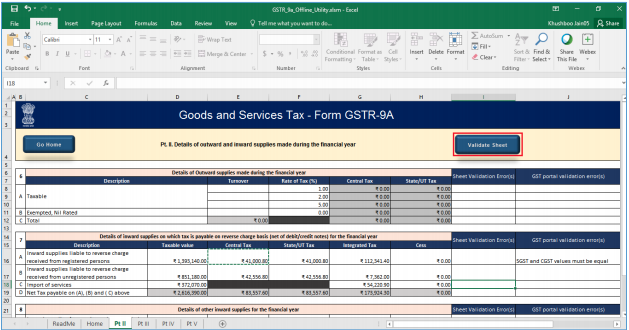
5) After making corrections in a sheet, click the Validate Sheet button to validate the sheet. Similarly, make corrections in all sheets and click the Validate Sheet button in each sheet.
6) From the tab you are on, go to the Home tab by either clicking the Go Home button or clicking the Home tab to generate summary. Follow steps mentioned in the following steps to generate and upload the JSON file: Generate JSON File to upload and Upload the generated JSON File on GST Portal.