FORM GST ITC-03 Offline Utility
An Overview
The ITC-03 Offline utility is provided to taxpayers who has availed input tax credit (ITC) and have opted for composition scheme or Where goods or services or both supplied by him become wholly exempted.
To facilitate the furnishing of records in short-time an easy to use excel offline tool has been made available for preparation of ITC-03 statement in download section of GST portal. All the details can be added in offline mode and later uploaded on GST portal to furnish the ITC-03 for the Return Period.
Downloading the FORM GST ITC-03 Offline Utility
Downloading the FORM GST ITC-03 Offline Utility is a one-time activity, however, it may require an update in future if the Tool is updated at the GST Portal. Please check the version of the offline utility used by you with the one available for download on the GST Portal at regular intervals.
To download and install the FORM GST ITC-03 Offline Utility to prepare the FORM GST ITC-03 return offline, perform the following steps:
You can download the FORM GST ITC-03 Offline Utility from the Portal without login to the GST Portal.
1) Access the https://www.gst.gov.in/ URL.
2) The GST Home page is displayed. Click the Downloads > Offline tools > ITC03 Offline Tool.

3) ITC03 Downloads page is opened. Click Download.
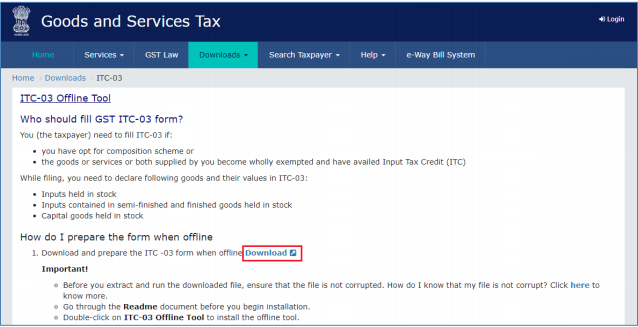
4) The ITC03 Offline Tool is downloaded in Downloads folder.
The download of the ITC03 Offline Tool usually takes 2-3 minutes to download depending on the Internet speed.

5) Before you Unzip and open the ITC03 offline tool, ensure that file is not corrupted
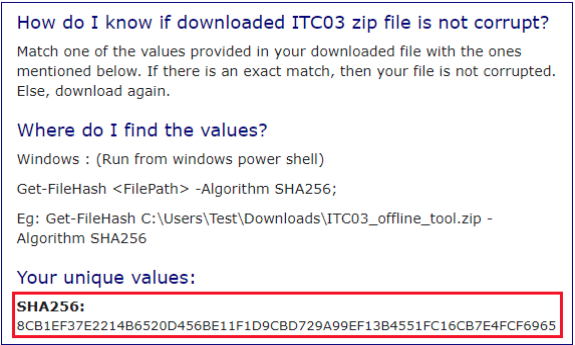
To test if the file is corrupted or not, Match one of the values provided in your downloaded file with the ones mentioned under Downloads of ICT03. If there is an exact match, then your file is not corrupted. Else, download again.
To find the values provided in your downloaded file follow steps below:
a. Open Windows PowerShell,
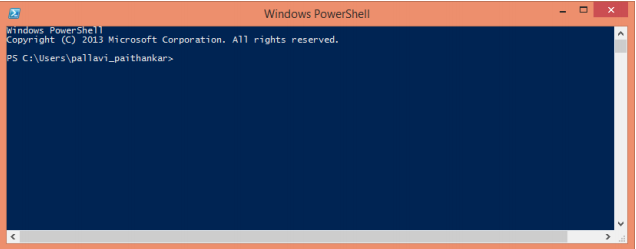
To Start Windows PowerShell, use the Search box on the Start menu, and type PowerShell. Click Windows PowerShell.
b. Window PowerShell opens.
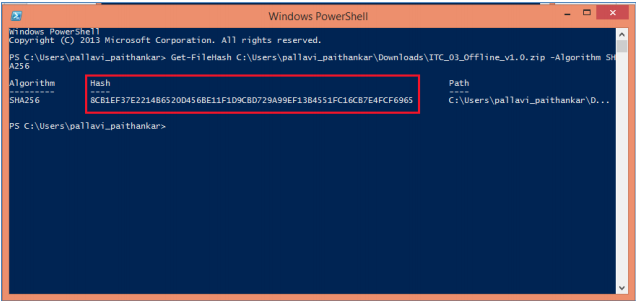
c. Provide the command in below format and enter.
Command: Get-FileHash <
> Algorithm < > e.g. Get-FileHash C:\Users\Test\Downloads\ ITC_03_Offline_v1.0.zip -Algorithm SHA256
d. Compare the Hash value that you have received with the has value provided in ITC_03_Offline_v1.0 downloads page.
Note: Above mentioned Unique values will change if Offline Utility Version changes.
e. If the hash value matches, unzip the downloaded folder.
Installation of the FORM GST ITC-03 Offline Tool
Once the download of the FORM GST ITC-03 Offline Tool is complete, you need to unzip these downloaded files on your machine.
1) Unzip the downloaded files and extract the files from the downloaded zip folder ITC_03_Offline_Utility.zip. Zip folder consists of the ITC_03_Offline_Utility file as shown in the screenshot below.

2) Double click the ITC_03_Offline_Utility file.
3) Click the Enable Content button in the excel sheet.
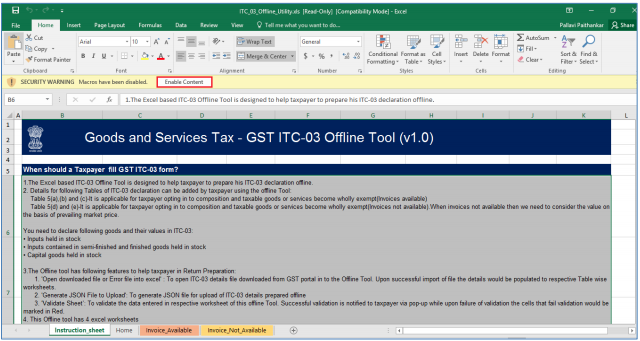
This Excel workbook template has 4 worksheets:
1) Instruction_sheet – Contains introduction and help instructions.
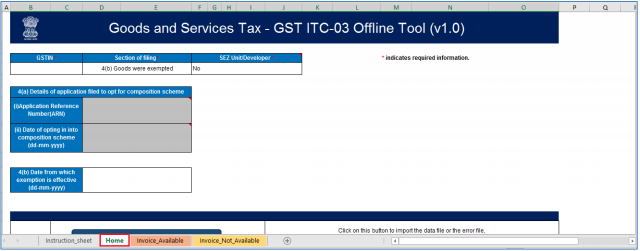
2) Home –
-
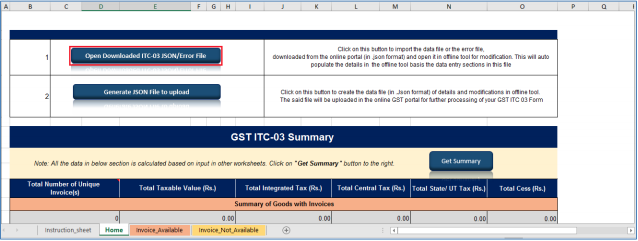
Open Downloaded ITC-03 JSON/Error File: Import and edit existing JSON file
-
Generate JSON File to Upload: Generate JSON file from the data entered in Sheet
‘Invoice_Available’ & ‘Invoice_Not_Available’.
3) Invoice_Available – Enter details of ITC-03 declaration with Invoices.
4) Invoice_Not_Available – Enter details of ITC-03 declaration without Invoices.
Prepare FORM GST ITC-03 Return
Let us take an example where you need to prepare the FORM GST ITC-03 using the FORM GST ITC 03 Offline Tool. To prepare the FORM GST ITC 03 Return, you need to perform the following steps:
-
Enter details in the Available worksheets of FORM GST ITC-03 Offline Tool.
-
Generate JSON file using ‘Generate File to Upload’ button
-
Upload the generated JSON on GST Portal. Preview the details uploaded, submit, offset liability and File return on the GST portal
1. Enter details in the Invoice_Available and Invoice_Not_Available worksheet of FORM GST ITC-03 Offline Tool
1) Please ensure that you download the latest version of FORM GST ITC-03 Offline Tool from the GST portal. https://www.gst.gov.in/download/returns
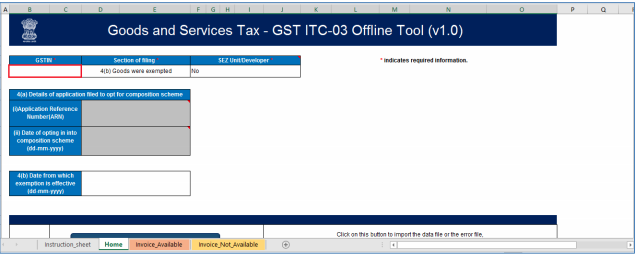
2) Launch the FORM GST ITC 03 Excel based Offline Tool and navigate to worksheet Home.
3) In the GSTIN of taxpayer field, enter the GSTIN.
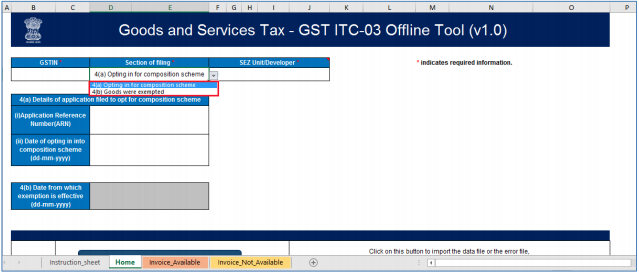
4) Select relevant ‘Section of filing’ from drop-down list.
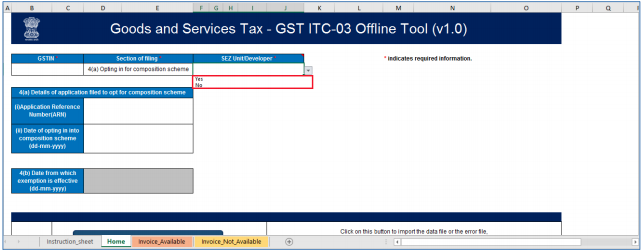
5) Select SEZ Unit/Developer –Yes/No from drop-down list.
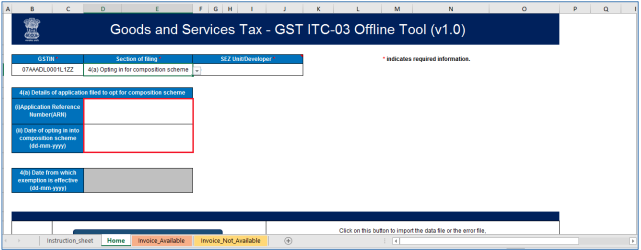
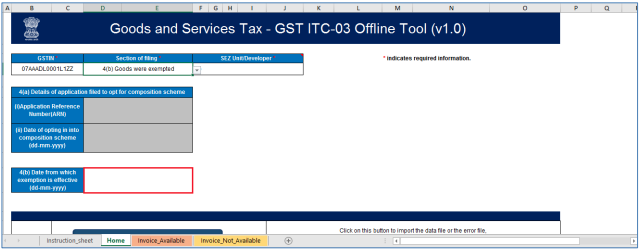
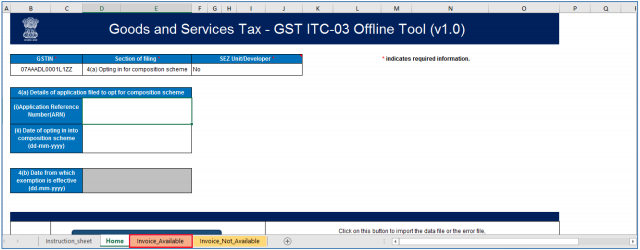
6) Under section 4(a)Details of Application filed to Opt for Composition Scheme, Enter (i) Application Reference Number (ARN) and Date of Opting in into composition scheme.
Note: If taxpayer selects 4(b) Goods were exempted under section- filing, enter the Date from which exemption is effective.
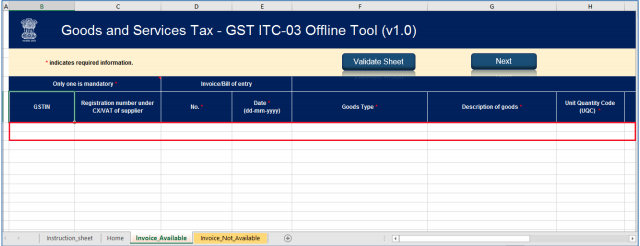
7) Navigate to next worksheet Invoice_Available.
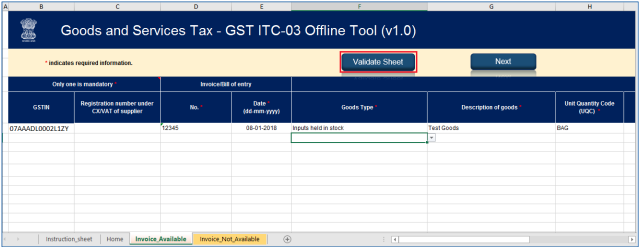
8) Enter details in each field as applicable.
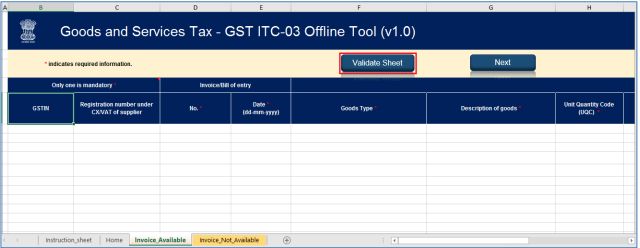
9) Once all details are entered, click the Validate Sheet button to validate the Invoice_Available worksheet.
Note: Only standard values available in any of drop down list can be selected. If a slight difference is found, it may not be detected in validation but will throw error while uploading on the Portal.
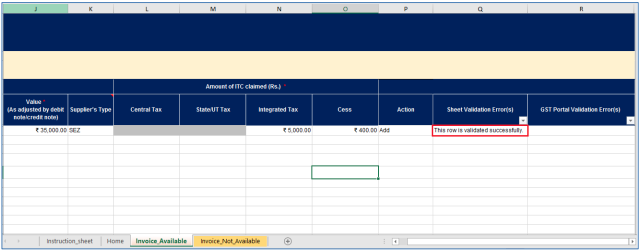
In case of successful validation:
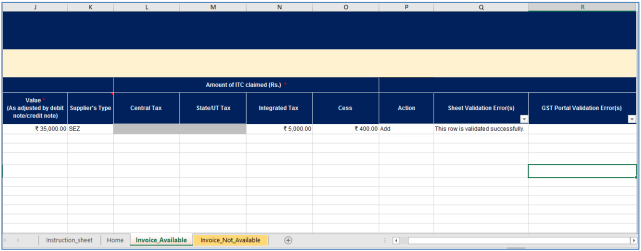
10) The error column shows This row is validated.
In case of unsuccessful validation:
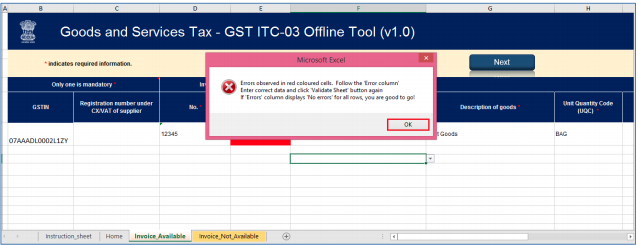
11) A pop-up message is displayed that Errors are shown with red colored cells. Click the OK button.
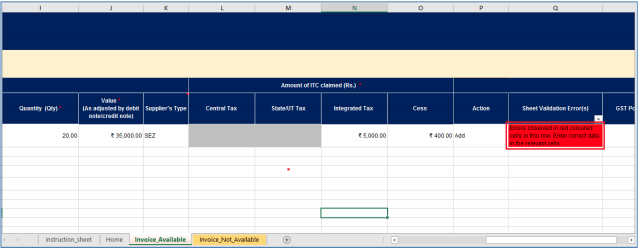
a. In case of validation failure; check for Errors column that have failed validation and correct errors with red colored cells.
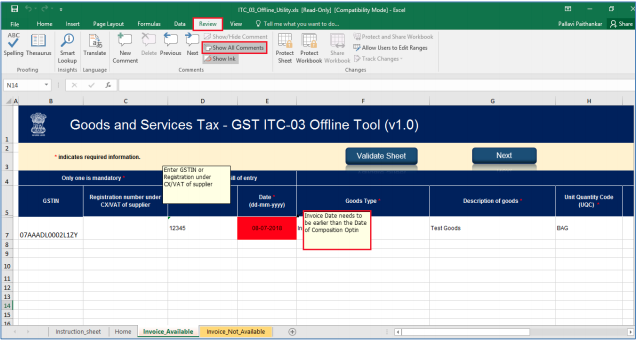
To view the comments for fields with errors, you can click the Review tab > Show All Comments link.
12) Once all errors are rectified, click the Validate Sheet button to validate the Invoice_Available worksheet.
13) The error column shows This row is validated.
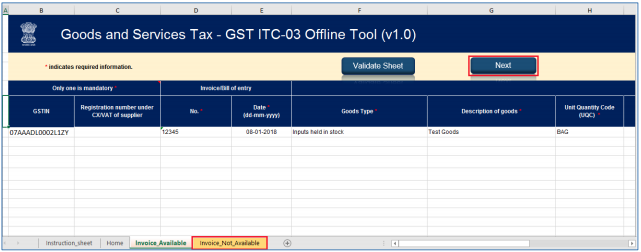
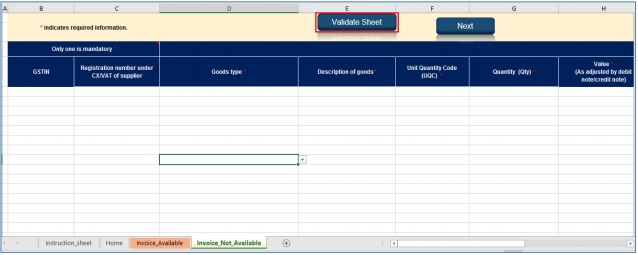
14) Navigate to the next worksheet Invoice_Not_Available.
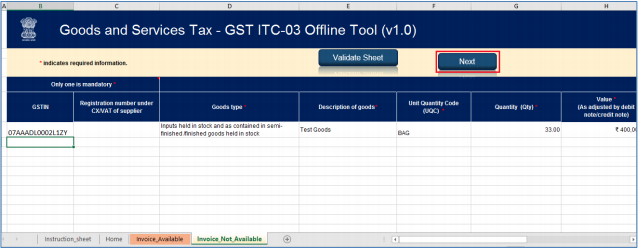
You can also click the Next button to navigate to worksheet Invoice_Not_Available.
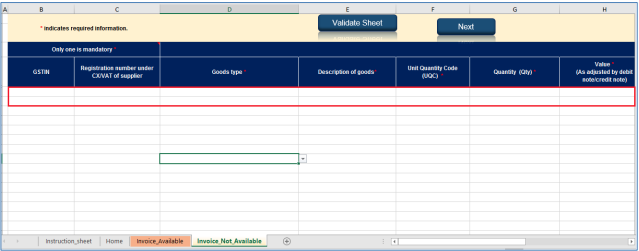
15) Enter details in each field as applicable.
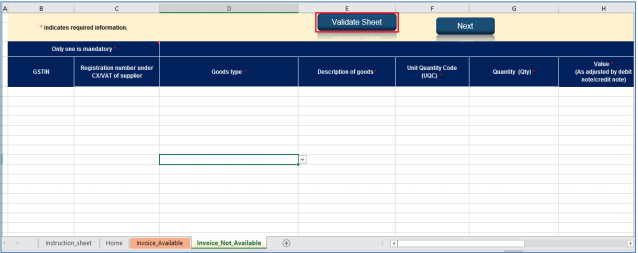
16) Once all details are entered, click the Validate Sheet button to validate the Invoice_Not_Available worksheet.
Note: In the worksheet ‘Invoice_Not_Available’, Goods Type should be selected from the drop-down only. Copy-Paste from ‘Invoice_Available’ may not be made in any case.
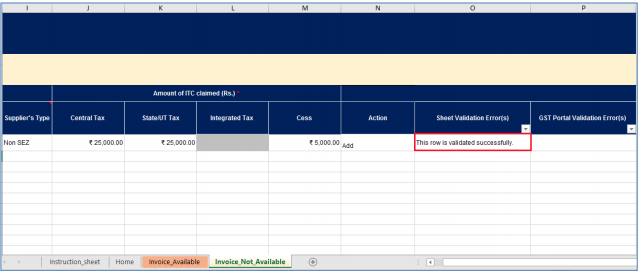
In case of successful validation:
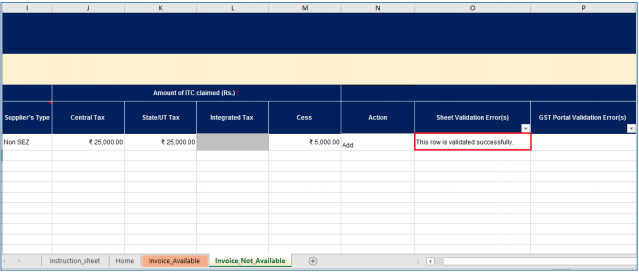
17) The error column shows This row is validated.
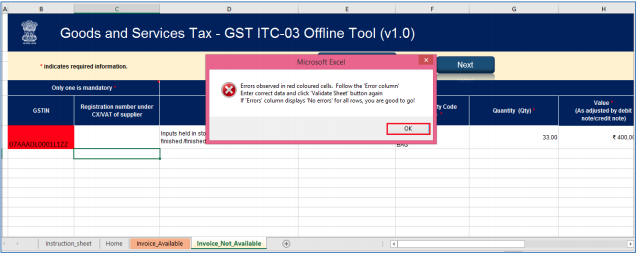
In case of unsuccessful validation:
18) A pop-up message is displayed that Errors are shown with red colored cells. Click the OK button.
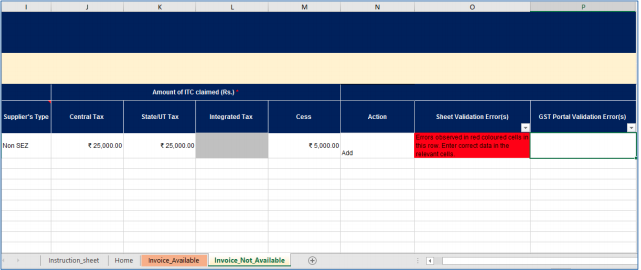
b. In case of validation failure, check for Errors column that have failed validation and correct errors with red colored cells.
To view the comments for fields with errors, you can click the Review tab > Show All Comments link.
19) Once all errors are rectified, click the Validate Sheet button to validate the Invoice_Not_Available worksheet.
20) The error column shows This row is validated.
2. Generate JSON file using ‘Generate File to Upload’ button
1) Upon successful validation; navigate to worksheet Home.
You can also click the Next button to navigate to worksheet Home.
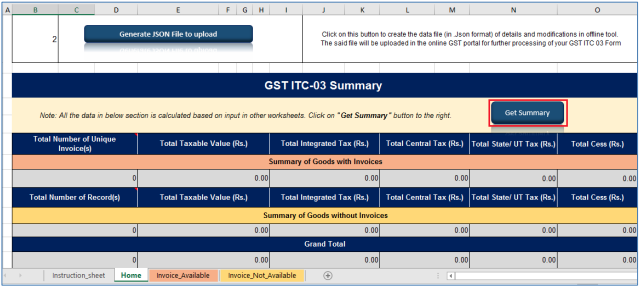
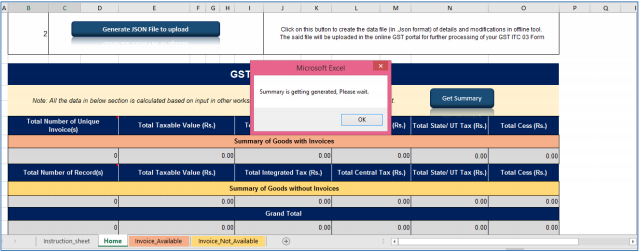
2) Click Get Summary to generate summary of the details updated in worksheets
Invoice_Available and Invoice_Not_Available.
3) Click OK to proceed.
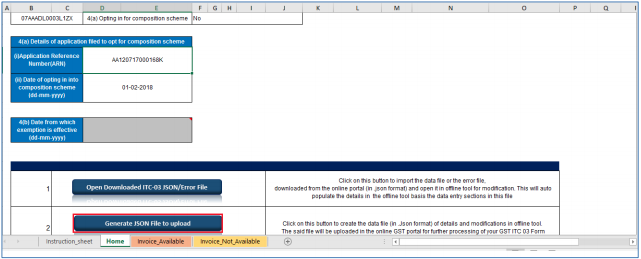
4) Once summary is generated and verified, Click the Generate JSON File to Upload button to generate JSON for upload on GST Portal.
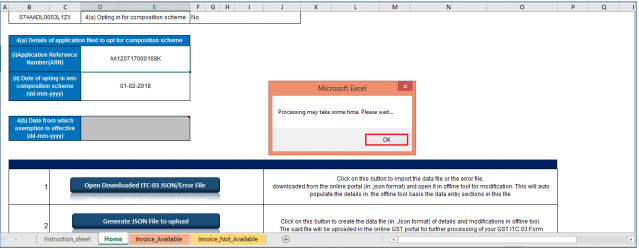
5) A message is displayed that processing may take some time. Click the OK button.
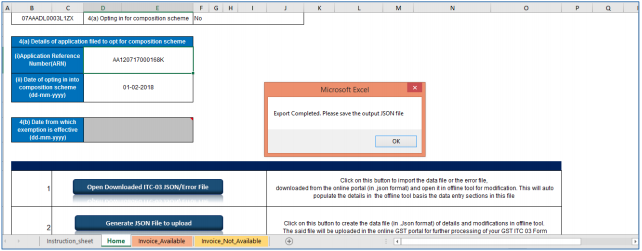
6) A confirmation message is displayed that export of JSON file has completed. Click the OK button.
JSON would be generated only if the worksheet has been successfully validated.
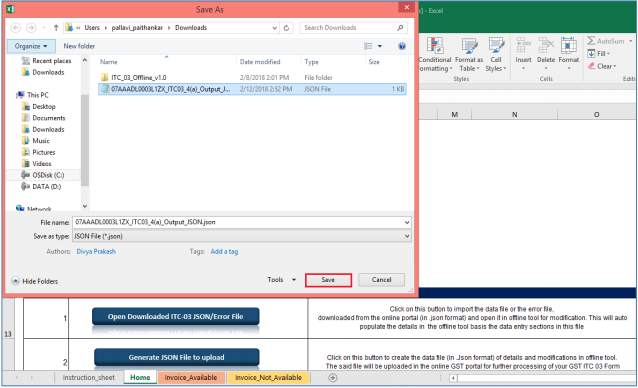
7) Navigate to the folder where you want to save the JSON file. Enter the file name and click the SAVE button.
Notice the JSON file created.
3. Upload the generated JSON on GST Portal
1) Access the https://gst.gov.in/ URL. The GST Home page is displayed.
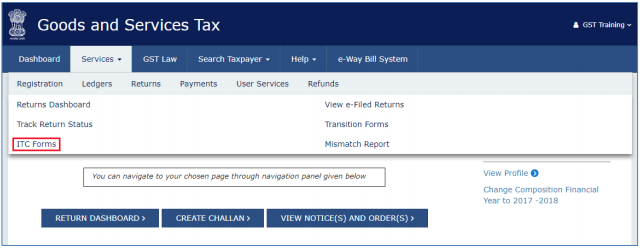
2) Click the Services > Returns > ITC Forms command.
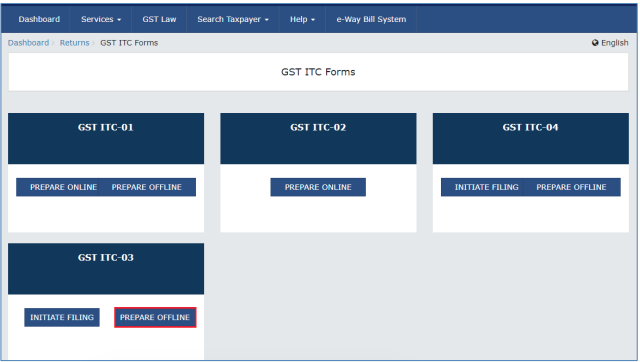
3) The GST ITC Forms page is displayed.
4) In the GST ITC-03 tile, click the PREPARE OFFLINE button.
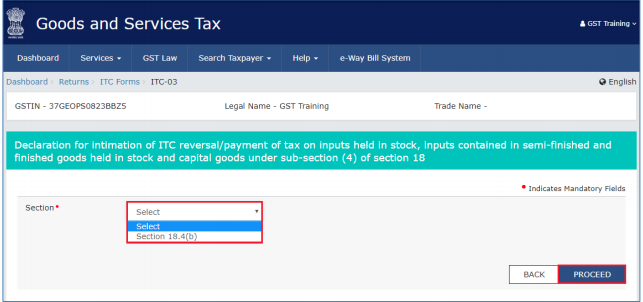
5) Select the Section from drop down list.
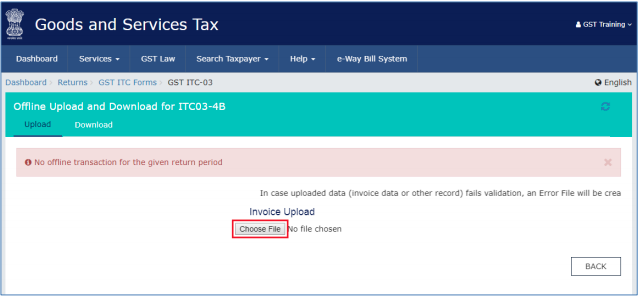
6) The Offline Upload for FORM GST ITC-03 page is displayed. Click the Choose File button.
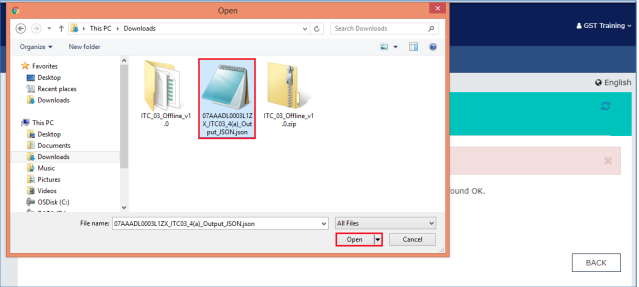
7) Browse and navigate the JSON file to be uploaded from your computer. Click the Open button.
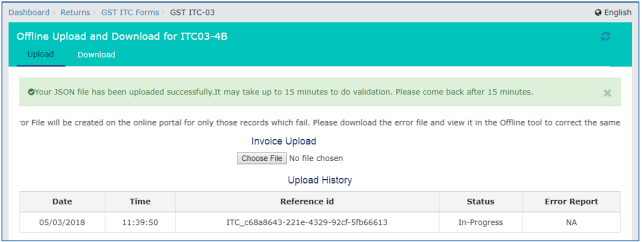
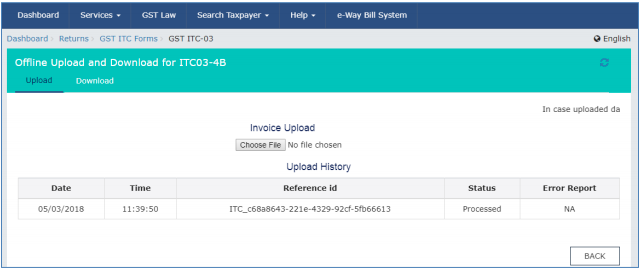
8) The uploaded JSON file would be validated and processed. Upon successful validation and processing the details entered would be populated as a summary.
In case of validation failure upon processing; errors if any would be shown on the GST Portal.
Please note it is possible to upload JSON multiple times on GST portal till submission. However, earlier uploaded data would be overwritten. Preview would reflect only the last data uploaded.
If the invoice item is already available from previous upload, then all the invoice items under that invoice will be replaced with the items which taxpayer is uploading this time. E.g: Invoice ABC had 5 items earlier from previous upload, now Taxpayer is uploading 2 items under invoice ABC. Then in database challan ABC will have only 2 items, replacing previous 5 items.
To add these items under existing invoice, user needs to enter all the items again Post successful upload of data on GST Portal, you can preview the form and file FORM GST ITC-03 return.
4. Open Downloaded Return File for ITC03
1) To Open the Downloaded Return file for ITC03, click “Open Downloaded ITC-04 JSON/Error File” on Home tab.
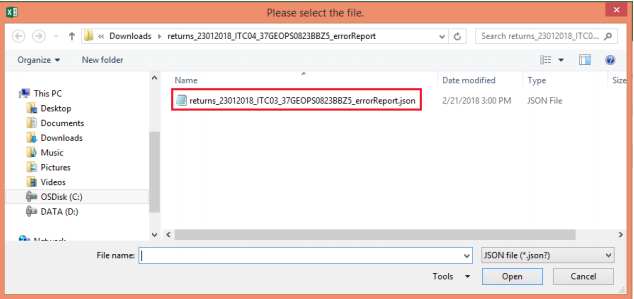
2) Browse the JSON(.json) file and click the Open button.
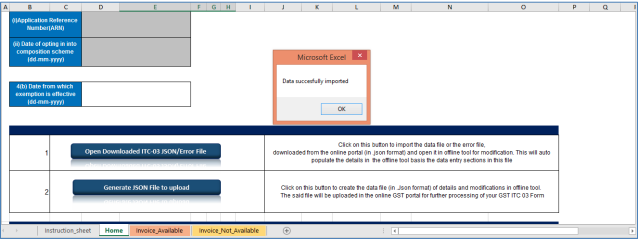
3) Select the downloaded JSON (.json) file and click on OK to proceed. Once successfully imported, you will get the message “Data successfully imported”
4) Now the sections for which you entered details of invoices/taxes to upload in GST portal will be populated with data automatically.
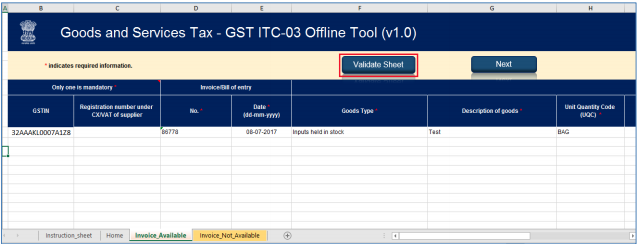
5) Modify the invoice details as per requirement.
6) After making the modifications, click the Validate Sheet button to validate the sheets.
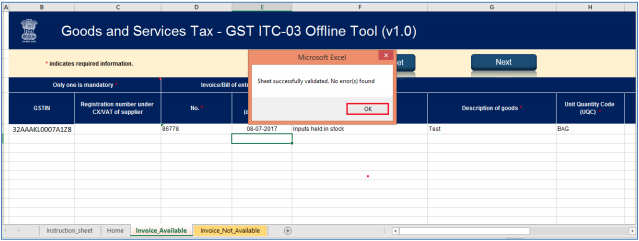
7) Pop-up saying “Sheet successfully validated. No error(s) found” appears once sheet is validated successfully.
8) 8. Click on ‘Generate JSON File to upload’ to generate JSON(.json) file for upload of ITC03 return details prepared offline on GST portal.
9) Follow steps mentioned in ITC03 JSON upload on GST Portal section to file ITC03.
5. Submission and Filing of ITC03
1) 1. Access the https://gst.gov.in/ URL. The GST Home page is displayed.
2) Click the Services > Returns > ITC Forms command.
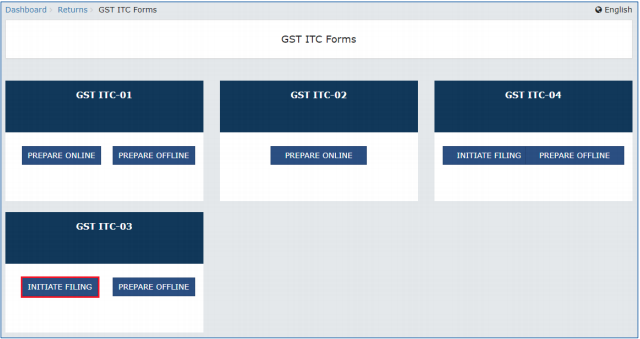
3) The GST ITC Forms page is displayed. Select GST ITC-03 > INITIATE FILING.
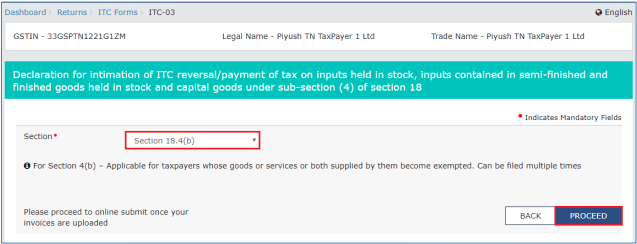
4) Select the Section from drop-down list
5) Click the PROCEED button.
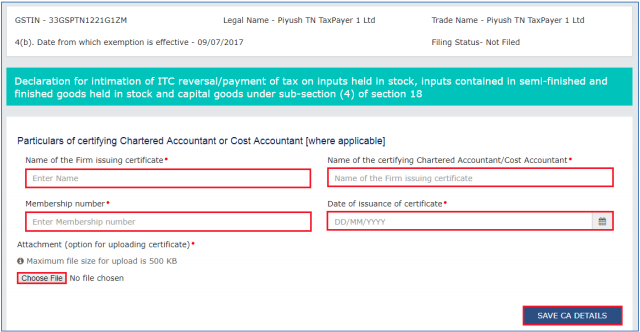
6) In the Particulars of certifying Chartered Accountant or Cost Accountant form update the Name of the Firm Issuing certificate, Name of the Certifying Chartered Accountatn/Cost Accountant, Membership Number, Date of Issuance of Certificate.
7) Upload the Certificate and click SAVE CA DETAILS.
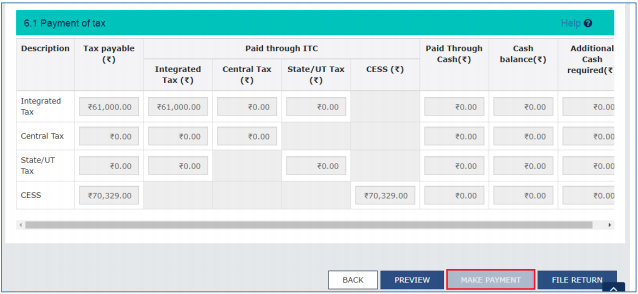
8) Select ‘Amount of ITC payable and paid’ tile.
9) Enter the payment details and click MAKE PAYMENT tab.
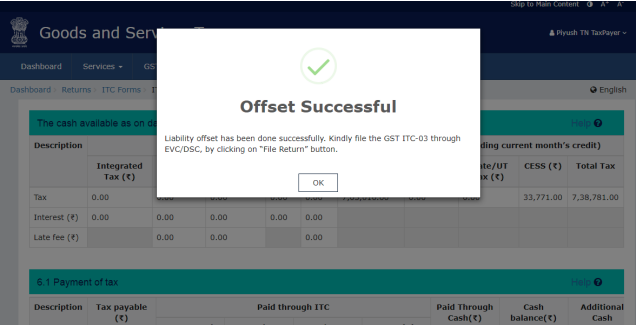
10) Once payment is successful, clikc OK to proceed for filing.
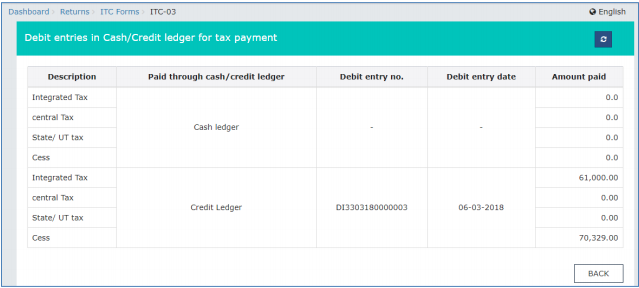
11) Once the payment is completed, ‘Debit entries in Cash/Credit Ledger for tax payment’ details reflect under the tile.
12) Click FILE RETURN.
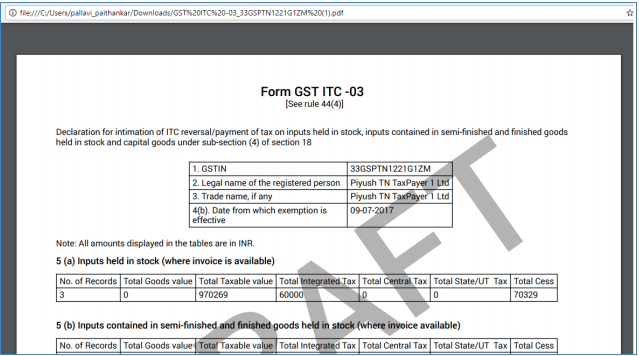
13) Preview of the ITC-03 draf can be seen with PREVIEW DRAFT ITC-03.
14) Draft opens in PDF format.
15) After preview is verified, proceed with filing the return. Click FILE RETURN.
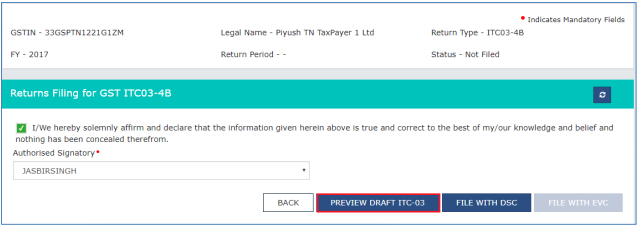
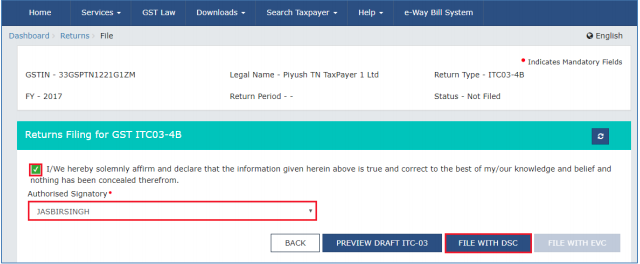
16) Select the checkbox.
17) Select the Authorized signatory from the drop-down list and click the FILE RETURN (With EVC or DSC) button.
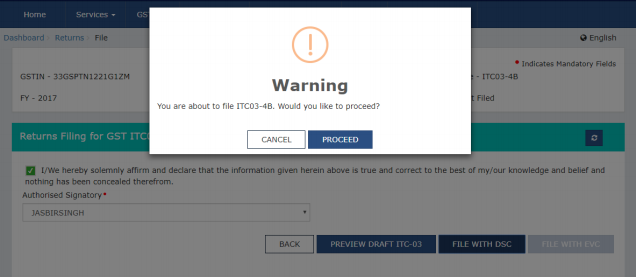
18) Once the Verification is completed, ARN will be generated and status is changed to Filed.

